The WooCommerce plugin is the core plugin to make an eCommerce WordPress website or plainly, a WooCommerce website. It could be a little confusing and difficult for beginners in getting started with WooCommerce. In this tutorial, we have guided you through the basic features of the WooCommerce plugin step by step and explained them as plainly as possible as you are getting started with WooCommerce. By the end of this tutorial, you will be able to install and set up the WooCommerce plugin and also create and edit products, set up payment methods, and manage orders. You can also use free WordPress themes for WooCommerce to build the best website..
Easy and Simple Tutorial to Get started with WooCommerce
Part 1: Installing and activating the WooCommerce plugin
Step 1:
To install WooCommerce, hover on the Plugins option on your dashboard and click on ‘Add New’.
Step 2:
You will be taken to the WordPress plugin directory page. Type “WooCommerce” on the search field at the top-right corner and you will find the WooCommerce plugin in the first position. Click on the ‘Install Now’ button.
Step 3:
After installing the plugin, you will see an ‘Activate Now’ option. Click to activate the WooCommerce plugin.
Step 4:
After activating, you will see the WooCommerce option on the dashboard. Hover your mouse pointer on WooCommerce and click on ‘Home’.
Part 2: Setting up the WooCommerce plugin
Step 5:
After clicking on ‘Home’ for the first time, you will be redirected to the setup wizard. The first tab you will be on is for your store details. Fill out the form with proper information and click on ‘Continue’.
Step 6:
On the second tab, you will be asked to choose the industry your store operates in. Choose options that suit your business best. You can choose multiple categories. After that, click on the ‘Continue’ button to proceed to the next step.
Step 7:
On the third tab, you will be asked to choose the type of product you want to sell. You can choose ‘Physical Products’ and ‘Downloads’ for free. There are some other options available like ‘Subscription’, ‘Membership’, etc. which are premium. You will also see an option for displaying monthly prices which you can turn off or turn on at any time. You can choose any other membership plugin in WordPress if you want. After the selection is complete, click on ‘Continue’ to move further.
Step 8:
On the fourth tab, named ‘Business Details’; you will be asked to input the approximate number of products you want to display and the location of selling products. Check the box if you are setting up a store on behalf of your client and click continue.
Step 9:
After clicking Continue, you will be offered some free features by WooCommerce. These features are selected by default. If you do not wish to receive these free features, you can simply uncheck the first tick mark. These features are useful to build a dynamic store thus it is recommended. After that, simply click on ‘Continue’ to move to the next step.
Step 10:
On the last tab, you will be asked to choose the theme you want to build your website with. You can select ‘Continue with the active theme’ to keep your currently active theme or find any other theme of your choice and click on the ‘choose’ button and your theme will be installed. You can browse all the themes at once or browse by ‘Free Theme’ and ‘Paid theme’ categories. There are many free responsive WooCommerce WordPress themes available in the market you can choose from.
Step 11:
After the setup wizard is complete, you will be redirected to the Jetpack plugin page to set up Jetpack. Basically there are several WordPress analytics plugins available in the market but you can go with the best one according to your choice. You will also notice some new options; Products, Payments, Analytics, and Marketing are added to the dashboard. Click on ‘Set up Jetpack’ if you want to install it.
Part 3: Creating a simple product with WooCommerce
Step 12:
The most important part of getting started with WooCommmerce is learning how to create products. Now hover on ‘Products’ in your dashboard and click on ‘Add New’ to create a new product.
Step 13:
After clicking on ‘Add New’, you will be taken to the page where you can create new products. Write your product name in the product title. You can also write a long product description in the text area marked in the image. Right after the description area, you will find the product data type option. ‘Simple Product’ type is selected by default. You can check the boxes for ‘Virtual’ and ‘Downloadable’ if your product is such.
Step 13:
On the General tab, type the regular price of your product in the ‘Regular Price’ field. If it is a discounted or sale item, write the sale price in the ‘sale price’ field. Click on the ‘Schedule’ option beside the ‘Sale Price’ field and set the sale start and end date.
Step 14:
In the Inventory tab, type product SKU in the ‘SKU’ field. Click on ‘Stock Status’ and choose stock condition.
Step 15:
If you want to manage your stock on the product level, check the box for ‘Manage Stock?’. Type the stock quantity in the respective field. Check the box ‘Sold Individually’ if you want to allow only one of this item to be bought in a single order.
Step 16:
In the Shipping tab, you can specify the weight and dimension of your product. Type the product’s weight in the ‘Weight’ field and dimensions in the ‘Dimensions’ field. If you want you can also set WooCommerce free shipping system by following some simple steps.
Step 17:
In the Linked Products tab, you can link products as Upsells and Cross-sells. Upsell products are which you prefer recommendation in product to the shoppers over the currently viewed product. Cross-sells products are which you promote in the cart based on the current product.
Step 18:
In the Attribute section, you can add certain features or specifications of the product. Write the name of the attribute in the ‘name’ field. Write values of the attribute in the ‘value(s)’ field. Separate each value with the ‘|’. Then click on ‘Save Attributes’. You can also add a WooCommerce product attribute if you want.
Step 19:
In the Advanced tab, you can set up an optional message you want to send to your customer after the purchase. Write any message on the ‘Purchase Note’ field for the customers. You can also check or uncheck the option for posting reviews of this particular product. Leave the ‘Menu Order’ by default.
Step 20:
In the ‘Get More Options’ tab, you will be offered different WooCommerce extensions for different shopping operations. You can click on the ‘Browse all extensions’ and visit the WooCommerce extension library to get your preferred one.
Step 21:
In the Extras tab, click on the ‘custom bubble’ option to enable it. Write the title in the ‘Custom Bubble Title’ field. You can also create a custom tab, simply write the title in the ‘custom title’ field and put your content in the ‘Custom Tab Content’ field. Shortcodes are allowed for custom tab content. In the ‘Product Video’ field, paste the link of your product video to embed it. You can choose whether the video should open in the lightbox like the Flatsome lightbox or in a new tab from the ‘Product Video Placement’ option. You can also show your preferred content on the top and at the bottom of the video. Simply put your content inside the ‘Top Content’ and ‘Bottom Content’ field respectively.
Step 22:
Write a brief description of the product in the short description section.
Step 23:
Click on the ‘Set featured image’ option to set a cover image for your product. Click on the ‘Add product gallery images’ to select multiple images of your product to create an image gallery.
Step 24:
Find your product categories from the ‘Product Categories’ box and check the boxes. Click on ‘save draft’ to save and publish your product later and you can also provide the same saving features for users with the help of the wishlist plugin for WooCommerce. Click on ‘Publish’ to post your product immediately and you have created your first WooCommerce product!
Part 4: Product List and Categories
Step 25:
Hover your pointer on ‘Products’ and click on ‘All Products”.
Step 26:
After clicking on the ‘All Products’ option, you will be taken to the product list page. Here you can find all the products you created with product SKU, price, categories, and publish date shown in the list.
Step 27:
Hover your pointer on any product and you will find options for trash, edit, view, and quick edit.
Step 28:
Hover on the ‘Product’ option in the dashboard and then click on ‘Categories’.
Step 29:
On the Product Categories page, complete the fields with proper information and click ‘Add New Category’. You will find all your create categories here. You can also edit any category by simply hovering on it and then clicking ‘Edit’. You can also set the sidebar menu for category collapse and expand easily with some simple steps.
Part 5: Setting up payment methods
Step 30:
It’s time to set up a payment method. On the dashboard, click on the ‘Payment’ option.
Step 31:
The WooCommerce plugin does all the hassle for you to provide payment methods. All you have to do is to click on the ‘Finish Setup’ button and the payment method setup is done! You can also add payment option icons to your website if you want.
Part 6: Checking Orders
Step 32:
Hover the pointer on ‘WooCommerce’ in your dashboard and click on the ‘Orders’ feature.
Step 33:
You will be redirected to the Orders page. From here, You will be able to keep track of all your orders. Mark the status of your order based on your order processing by clicking the ‘action’ option at the left end. You can browse your orders by status like pending payment, on hold, delivered, etc.
Conclusion
We have tried to guide you through the basic features of the WooCommerce plugin step by step. We hope this tutorial would be helpful to you as you are getting started with WooCommerce. If this beginner’s guide for WooCommerce became useful to you, You can also set featured products for your store easily. feel free to share this article! You can also go through our list of Must-Have WooCommerce Plugins for Your Store (2022) to explore the most popular and necessary plugins for your online store.
 To install WooCommerce, hover on the Plugins option on your dashboard and click on ‘Add New’.
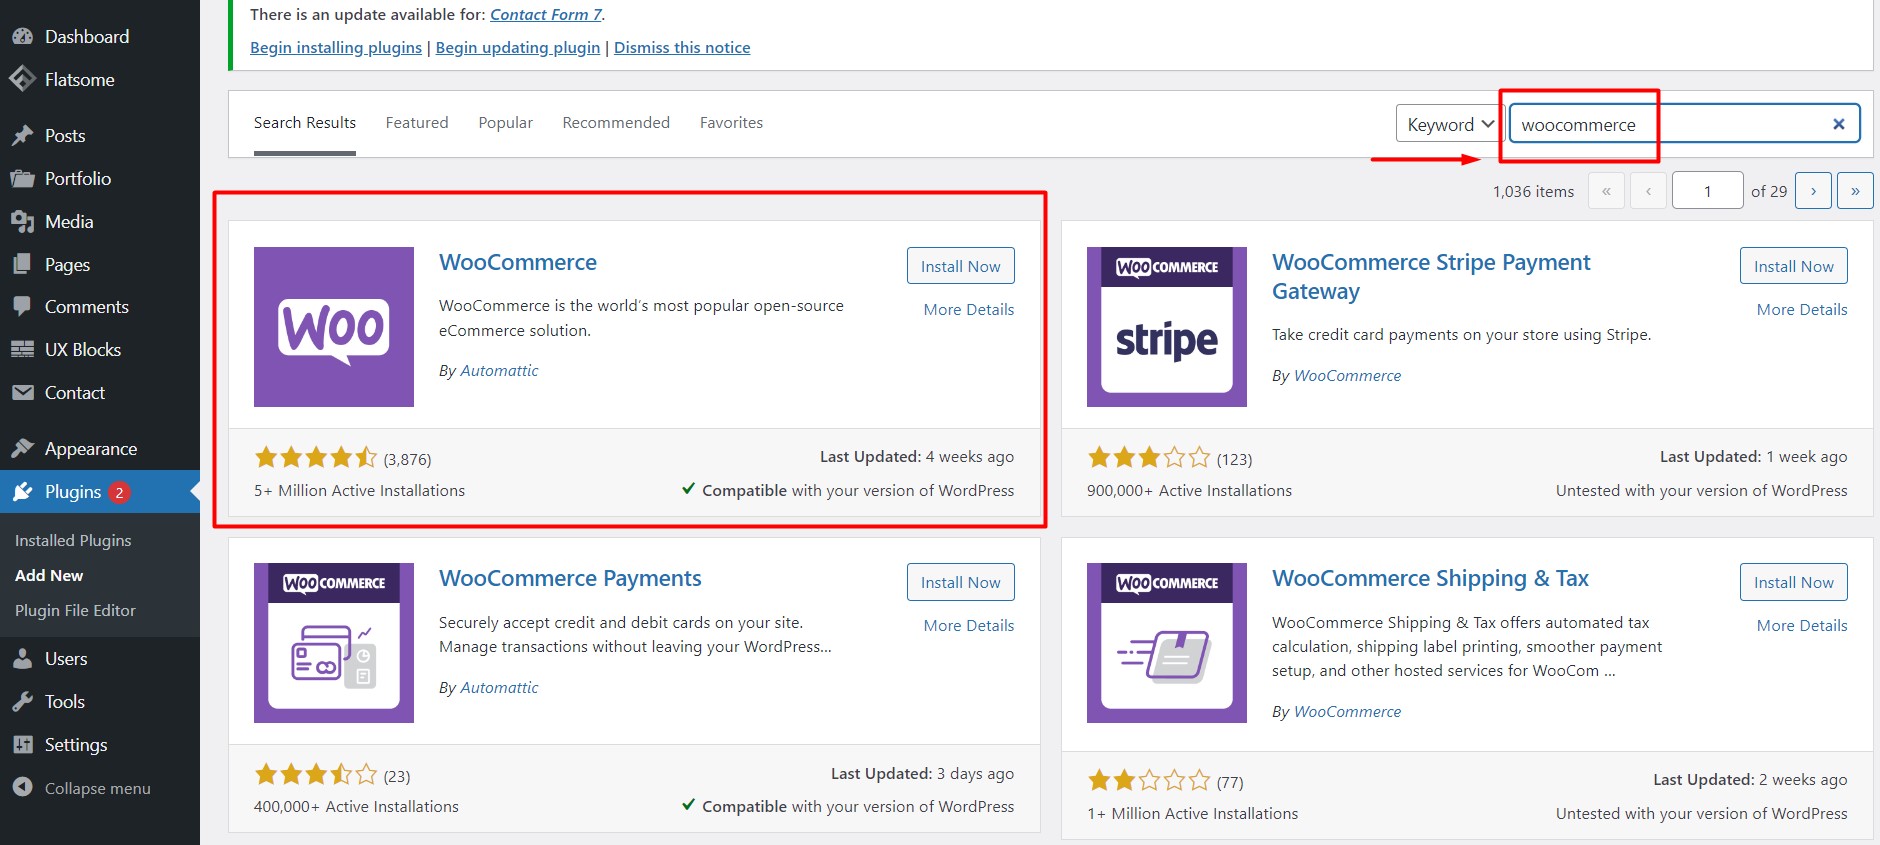 You will be taken to the WordPress plugin directory page. Type “WooCommerce” on the search field at the top-right corner and you will find the WooCommerce plugin in the first position. Click on the ‘Install Now’ button.
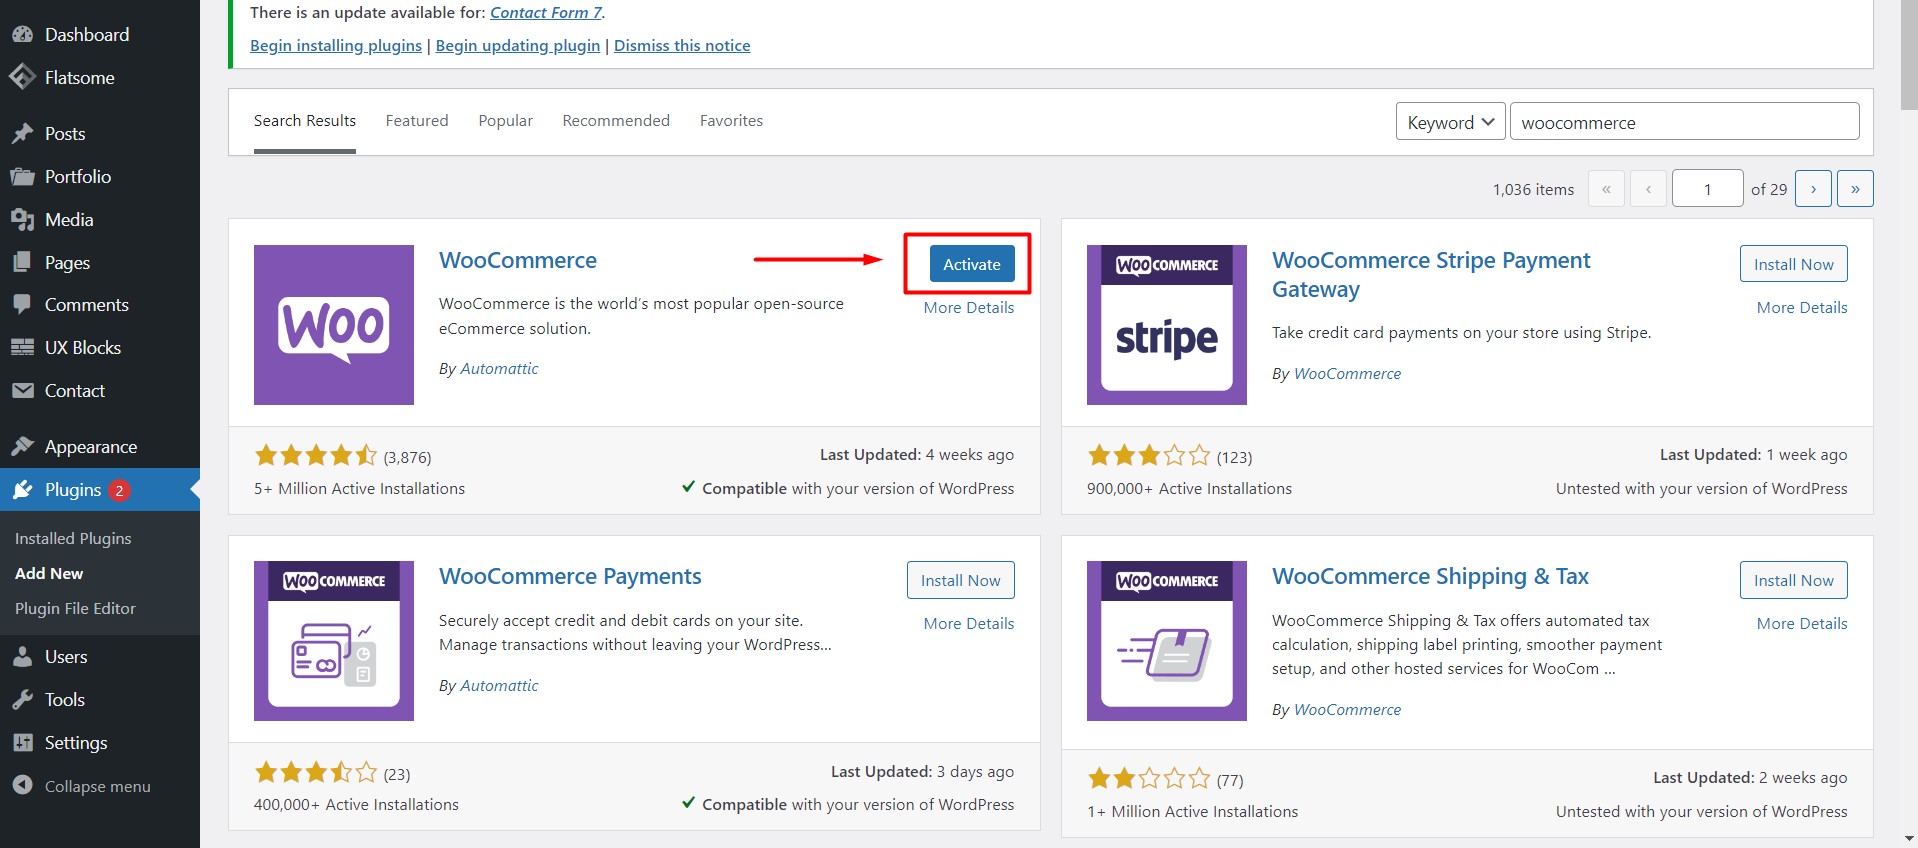 After installing the plugin, you will see an ‘Activate Now’ option. Click to activate the WooCommerce plugin.
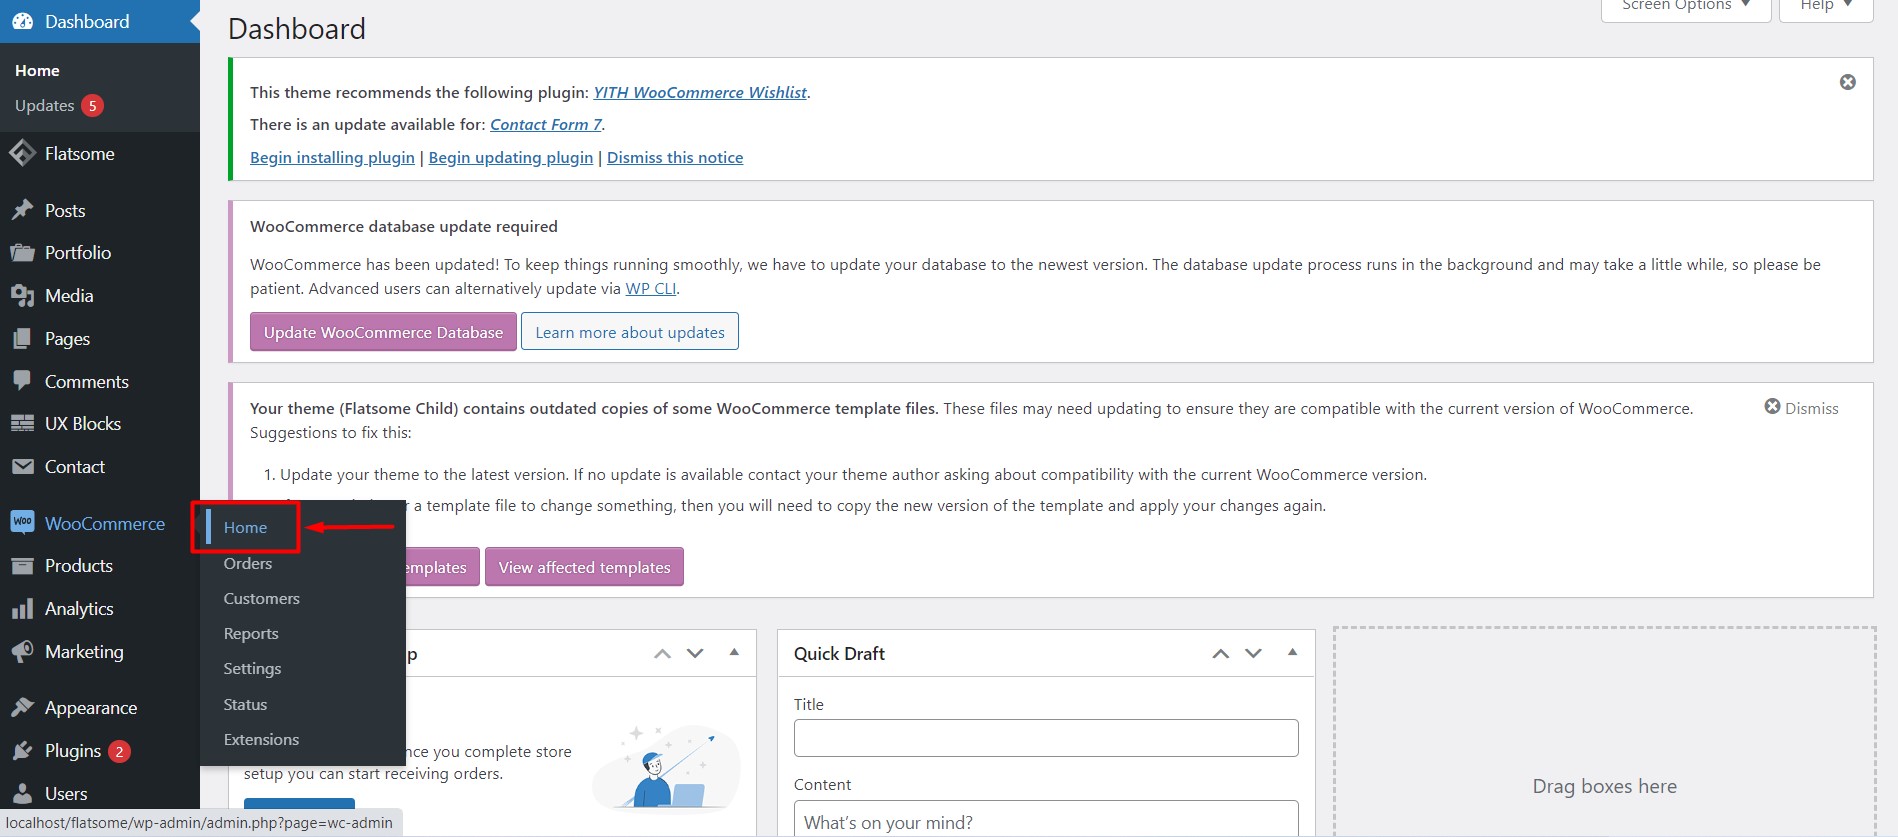 After activating, you will see the WooCommerce option on the dashboard. Hover your mouse pointer on WooCommerce and click on ‘Home’.
 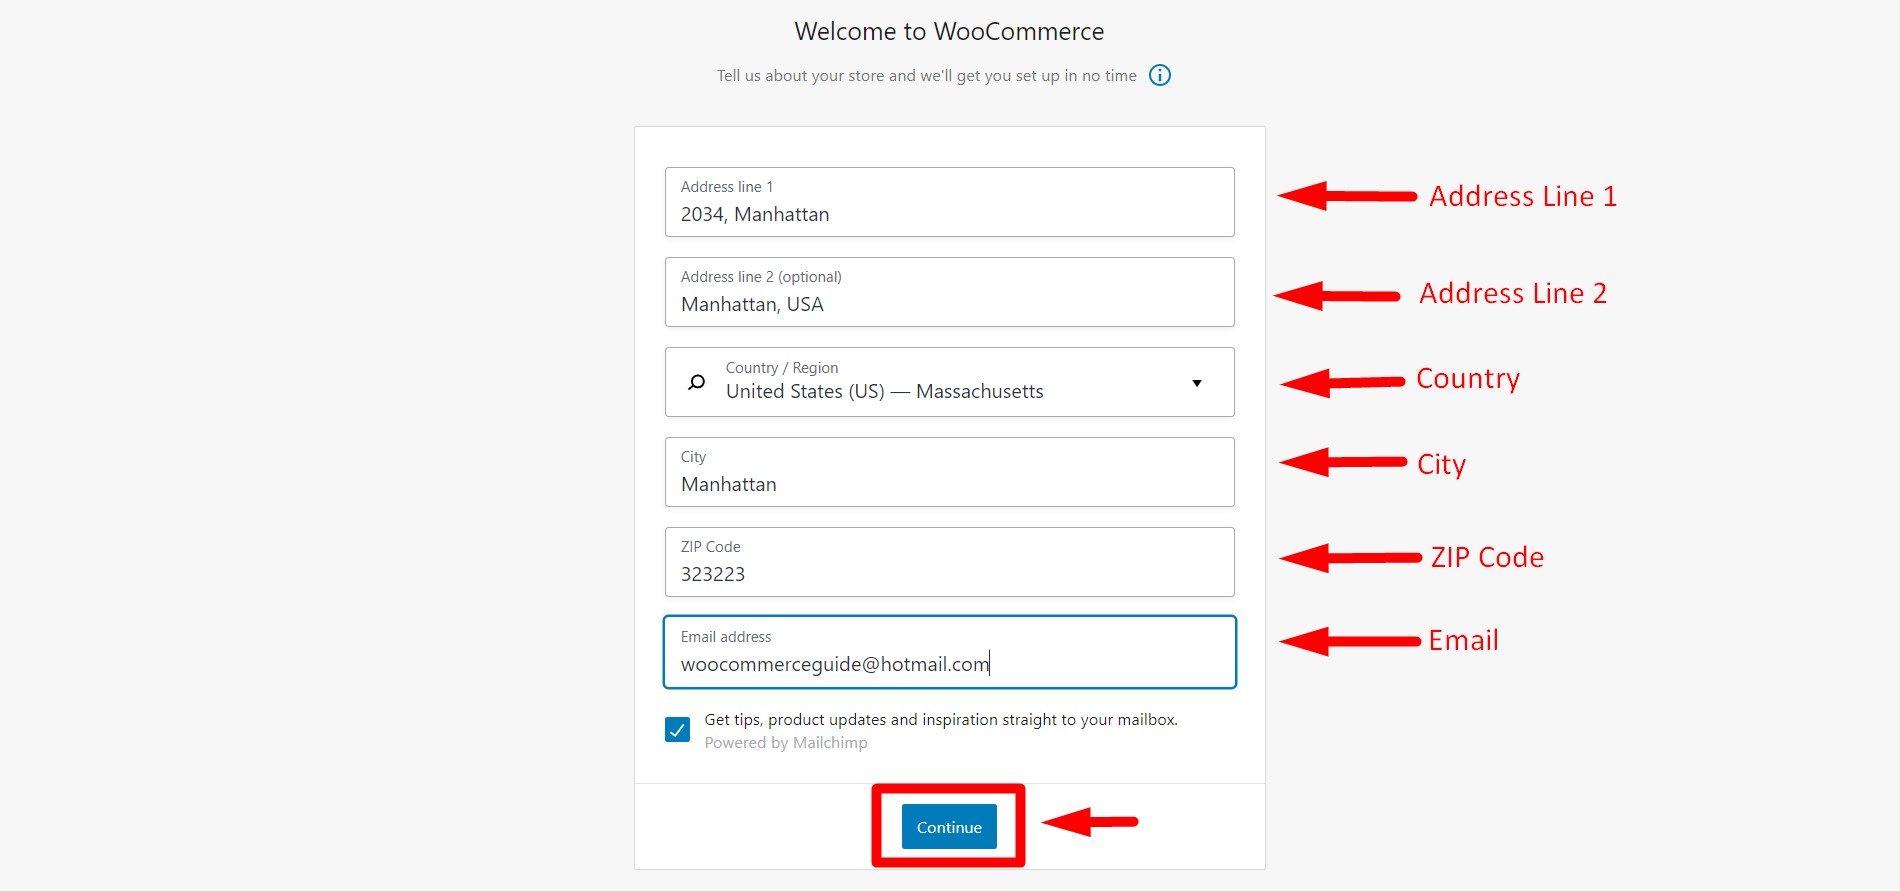 After clicking on ‘Home’ for the first time, you will be redirected to the setup wizard. The first tab you will be on is for your store details. Fill out the form with proper information and click on ‘Continue’.
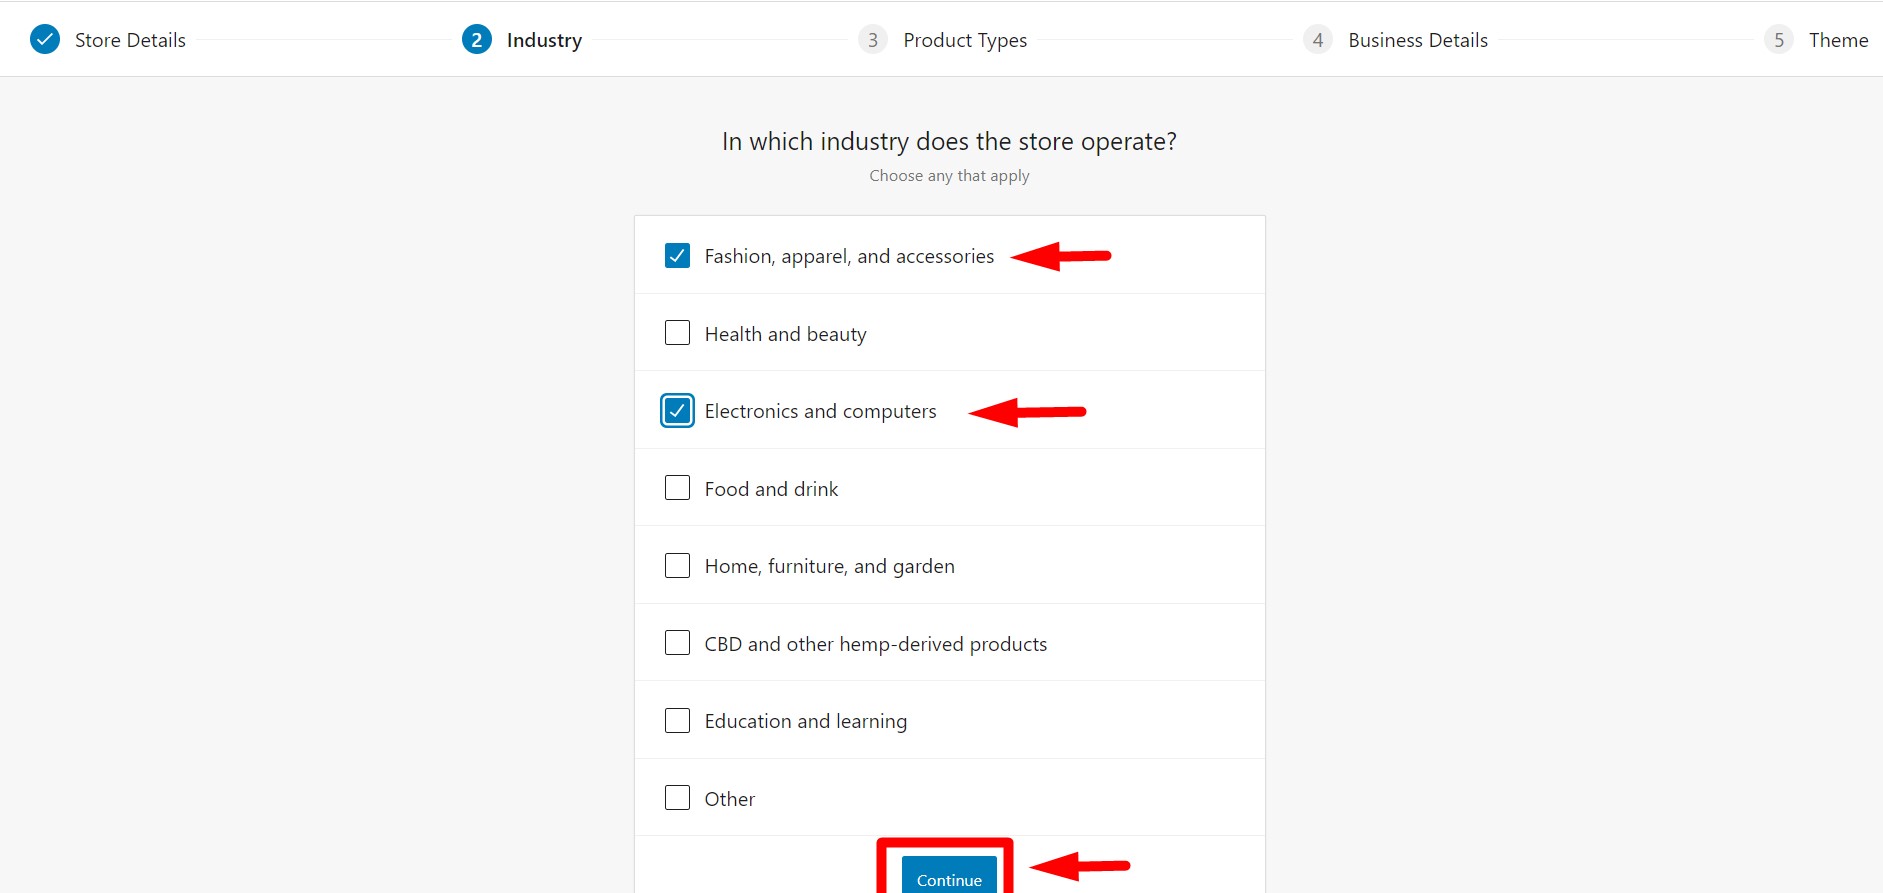 On the second tab, you will be asked to choose the industry your store operates in. Choose options that suit your business best. You can choose multiple categories. After that, click on the ‘Continue’ button to proceed to the next step.
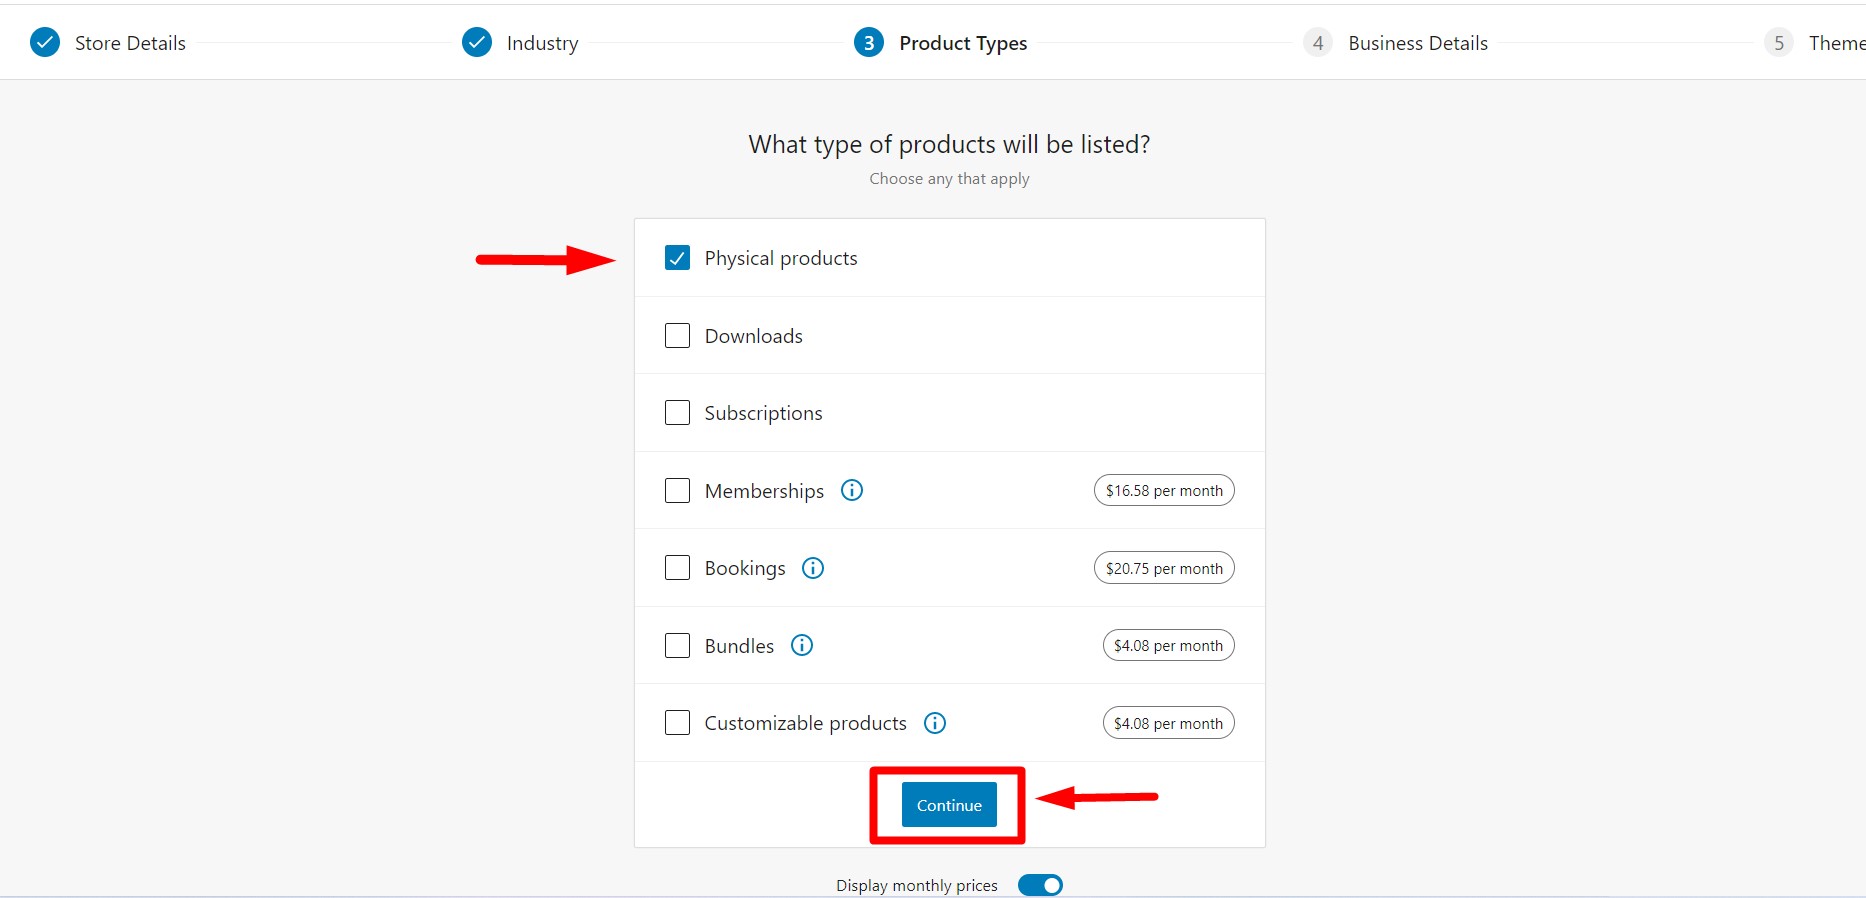 On the third tab, you will be asked to choose the type of product you want to sell. You can choose ‘Physical Products’ and ‘Downloads’ for free. There are some other options available like ‘Subscription’, ‘Membership’, etc. which are premium. You will also see an option for displaying monthly prices which you can turn off or turn on at any time. You can choose any other membership plugin in WordPress if you want. After the selection is complete, click on ‘Continue’ to move further.
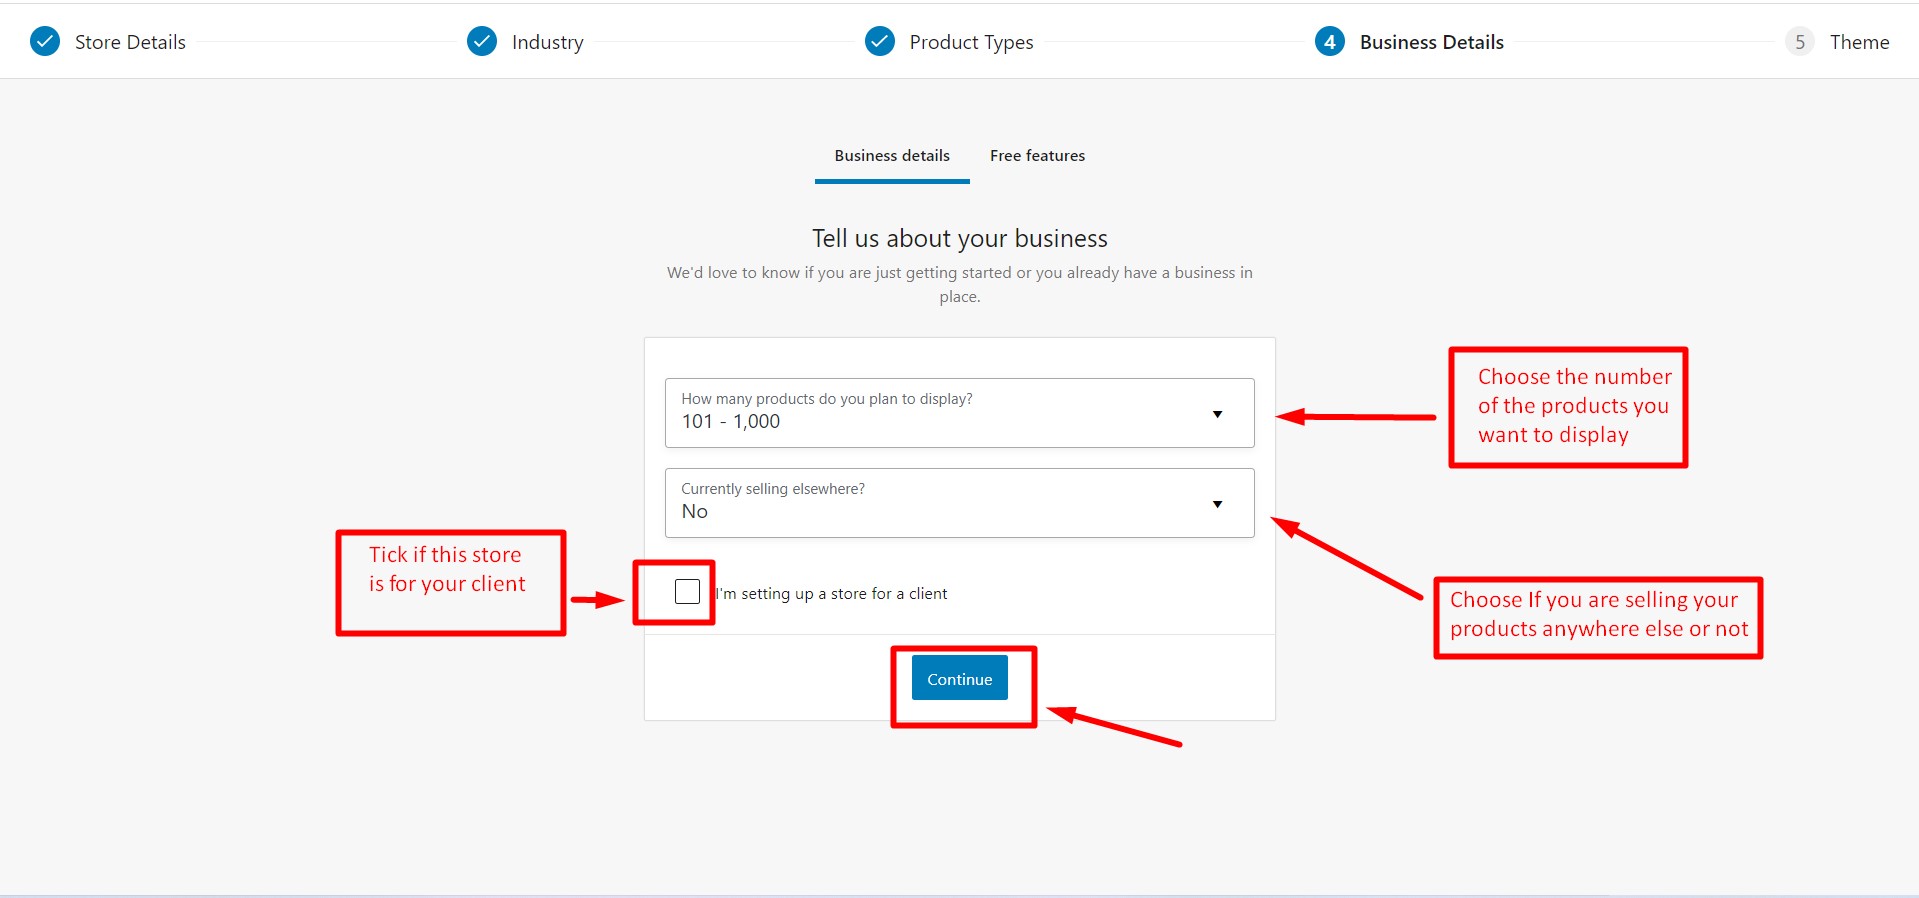 On the fourth tab, named ‘Business Details’; you will be asked to input the approximate number of products you want to display and the location of selling products. Check the box if you are setting up a store on behalf of your client and click continue.
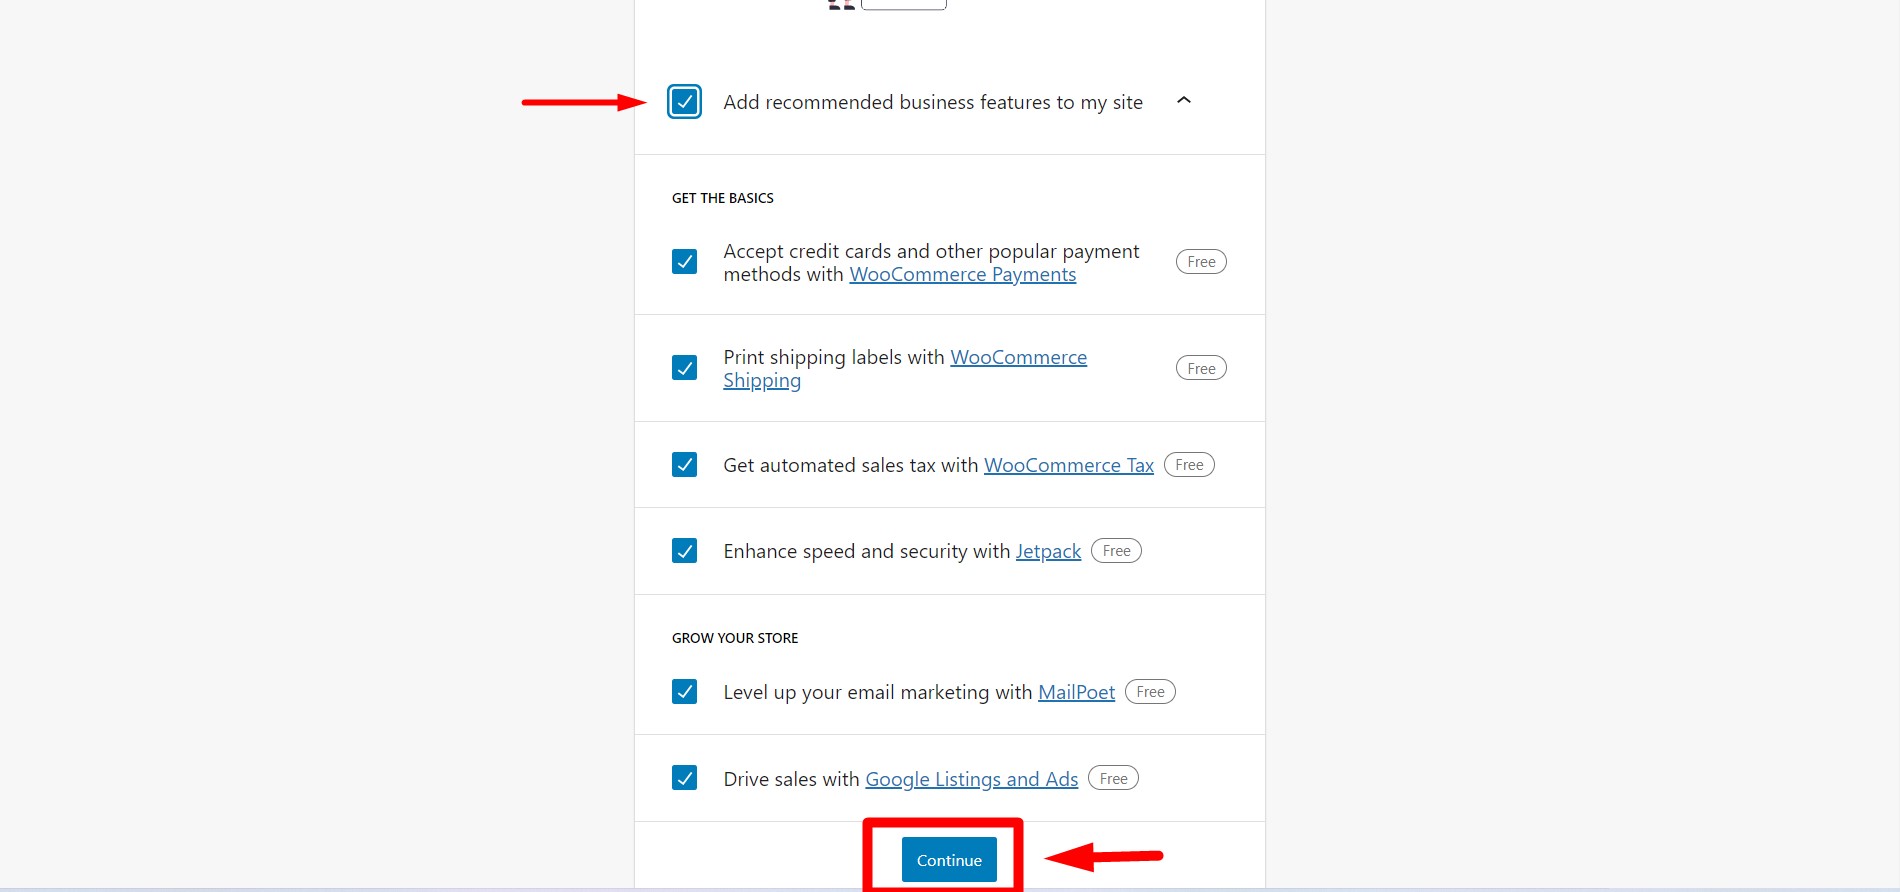 After clicking Continue, you will be offered some free features by WooCommerce. These features are selected by default. If you do not wish to receive these free features, you can simply uncheck the first tick mark. These features are useful to build a dynamic store thus it is recommended. After that, simply click on ‘Continue’ to move to the next step.
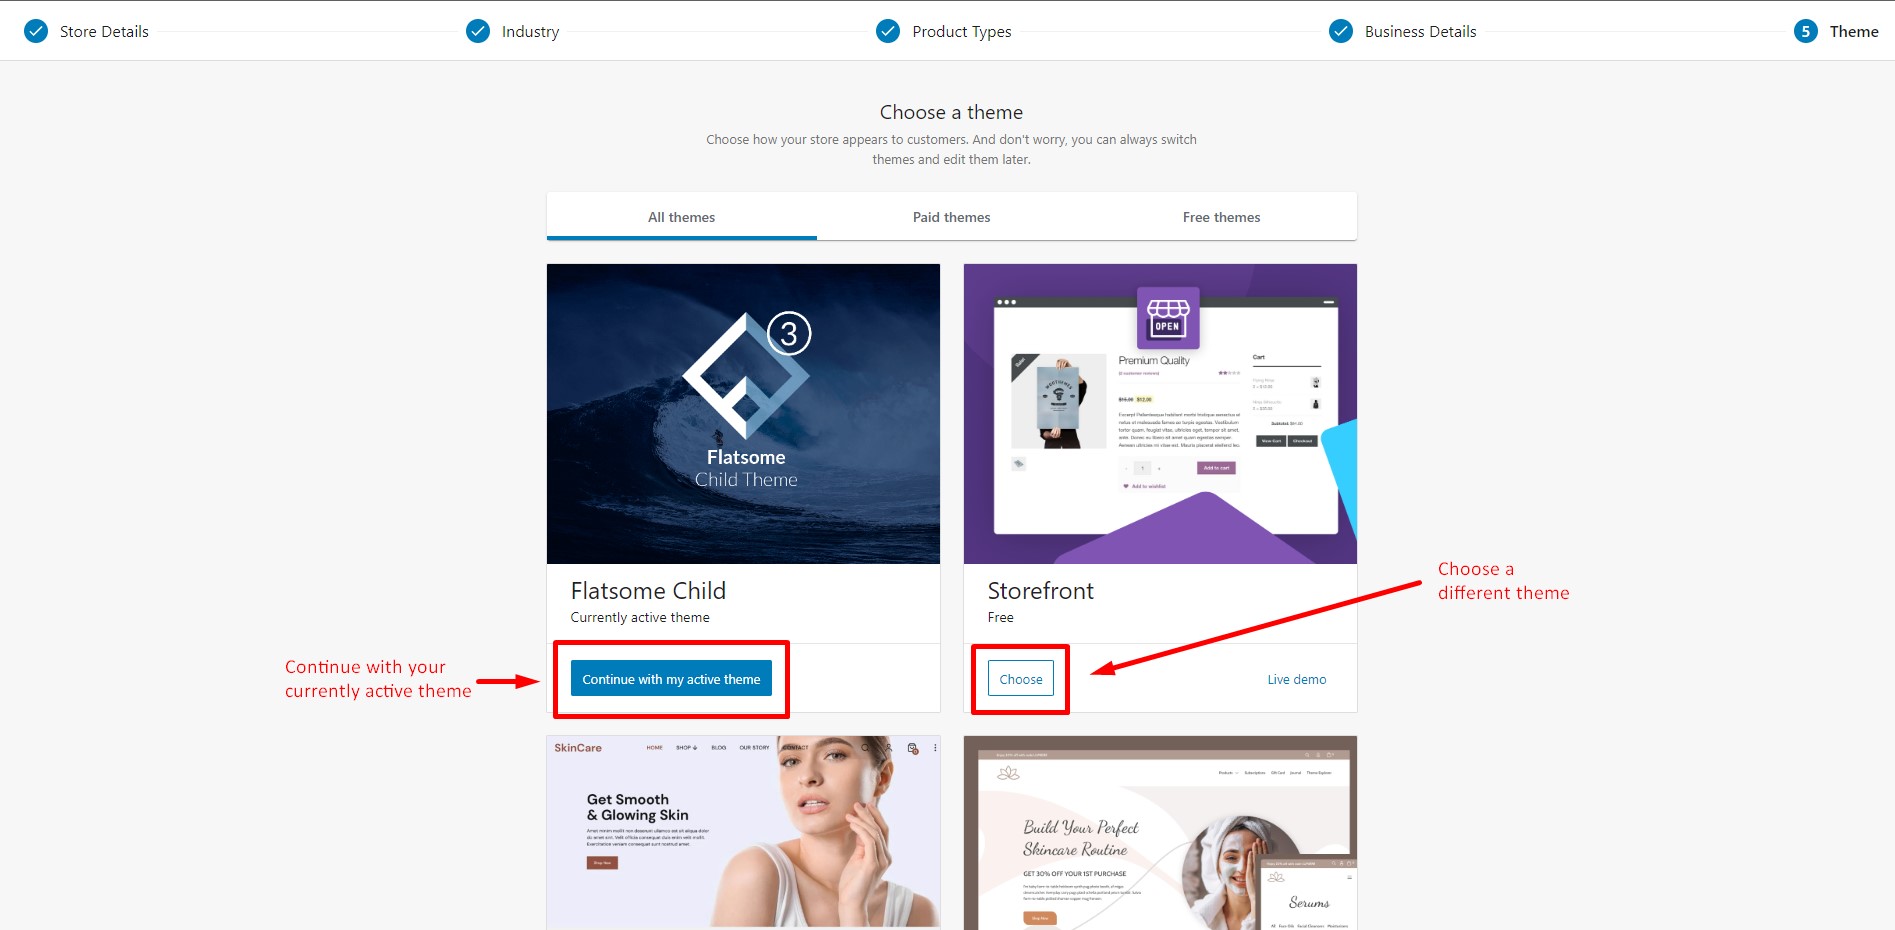 On the last tab, you will be asked to choose the theme you want to build your website with. You can select ‘Continue with the active theme’ to keep your currently active theme or find any other theme of your choice and click on the ‘choose’ button and your theme will be installed. You can browse all the themes at once or browse by ‘Free Theme’ and ‘Paid theme’ categories. There are many free responsive WooCommerce WordPress themes available in the market you can choose from.
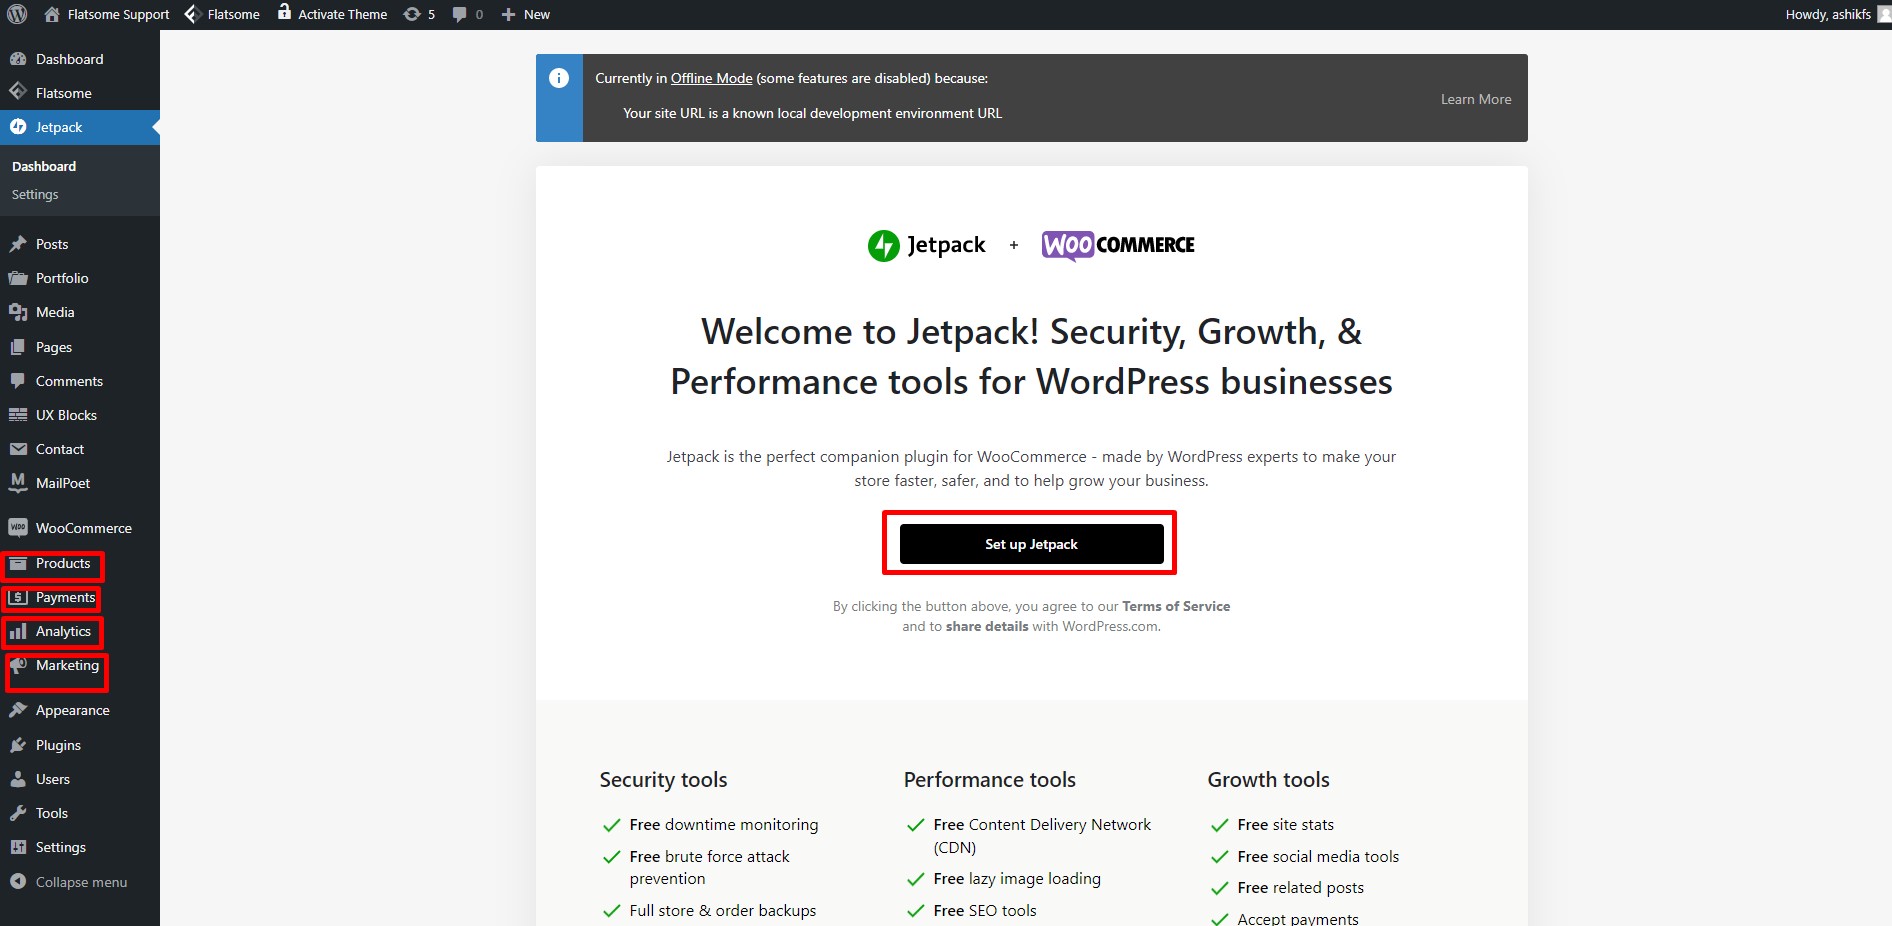 After the setup wizard is complete, you will be redirected to the Jetpack plugin page to set up Jetpack. Basically there are several WordPress analytics plugins available in the market but you can go with the best one according to your choice. You will also notice some new options; Products, Payments, Analytics, and Marketing are added to the dashboard. Click on ‘Set up Jetpack’ if you want to install it.
 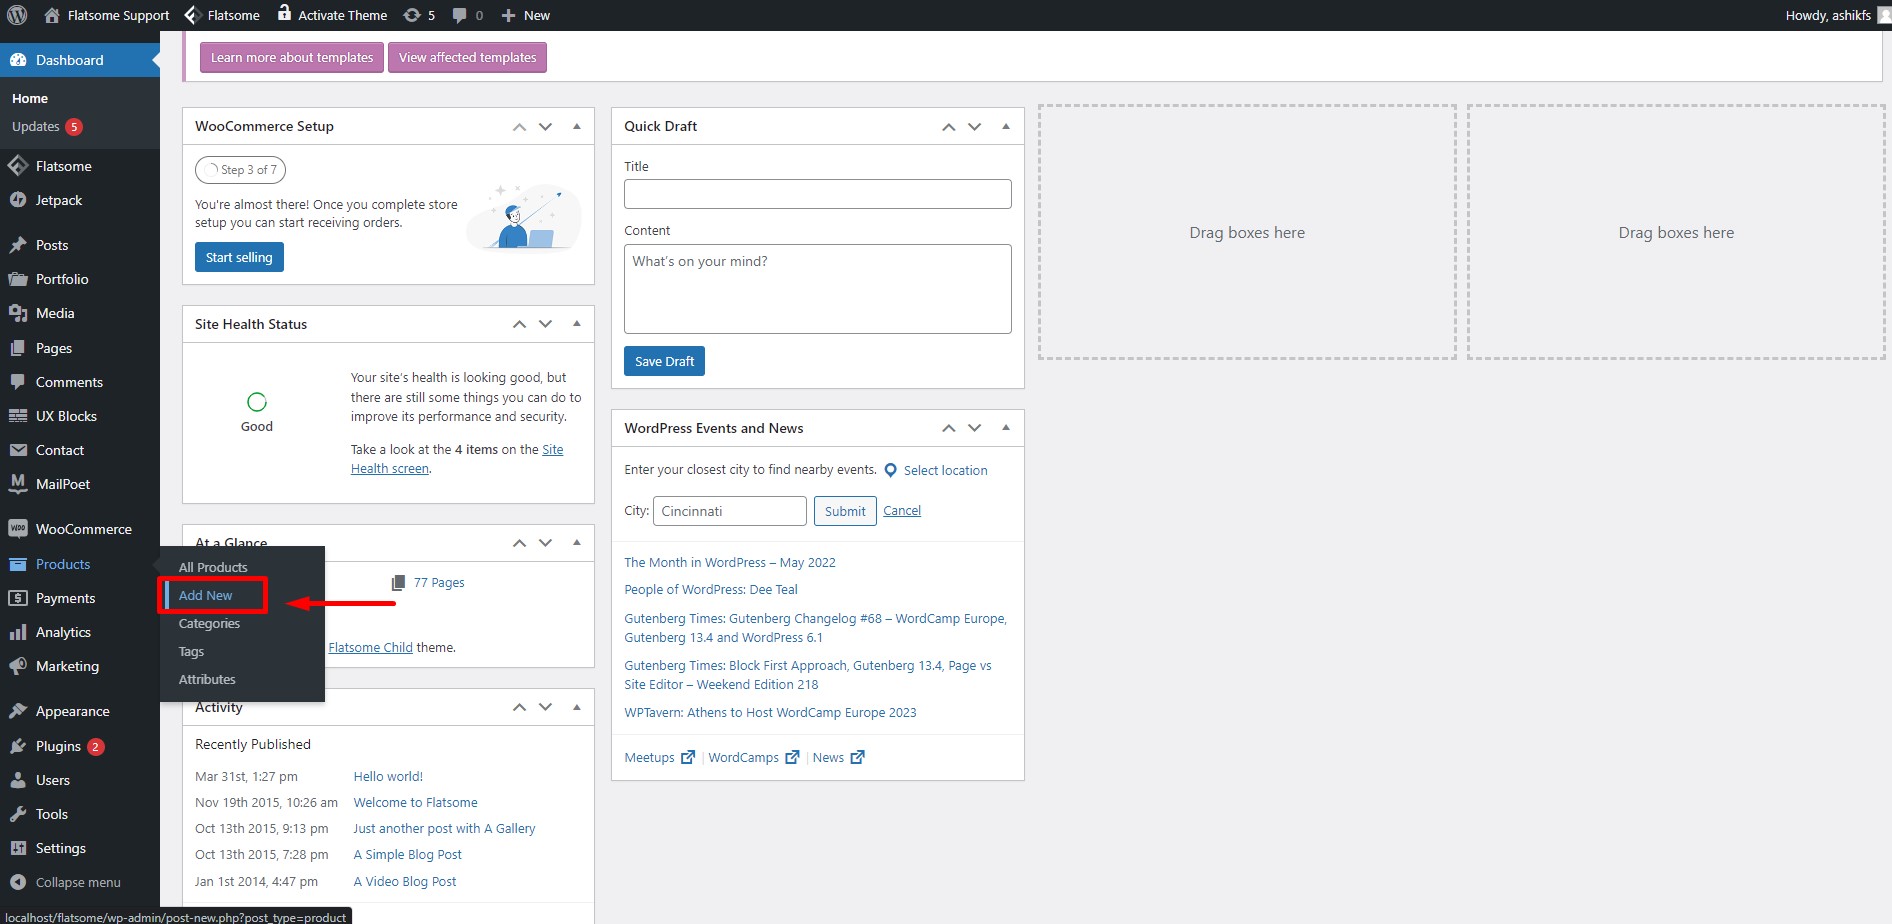 The most important part of getting started with WooCommmerce is learning how to create products. Now hover on ‘Products’ in your dashboard and click on ‘Add New’ to create a new product.
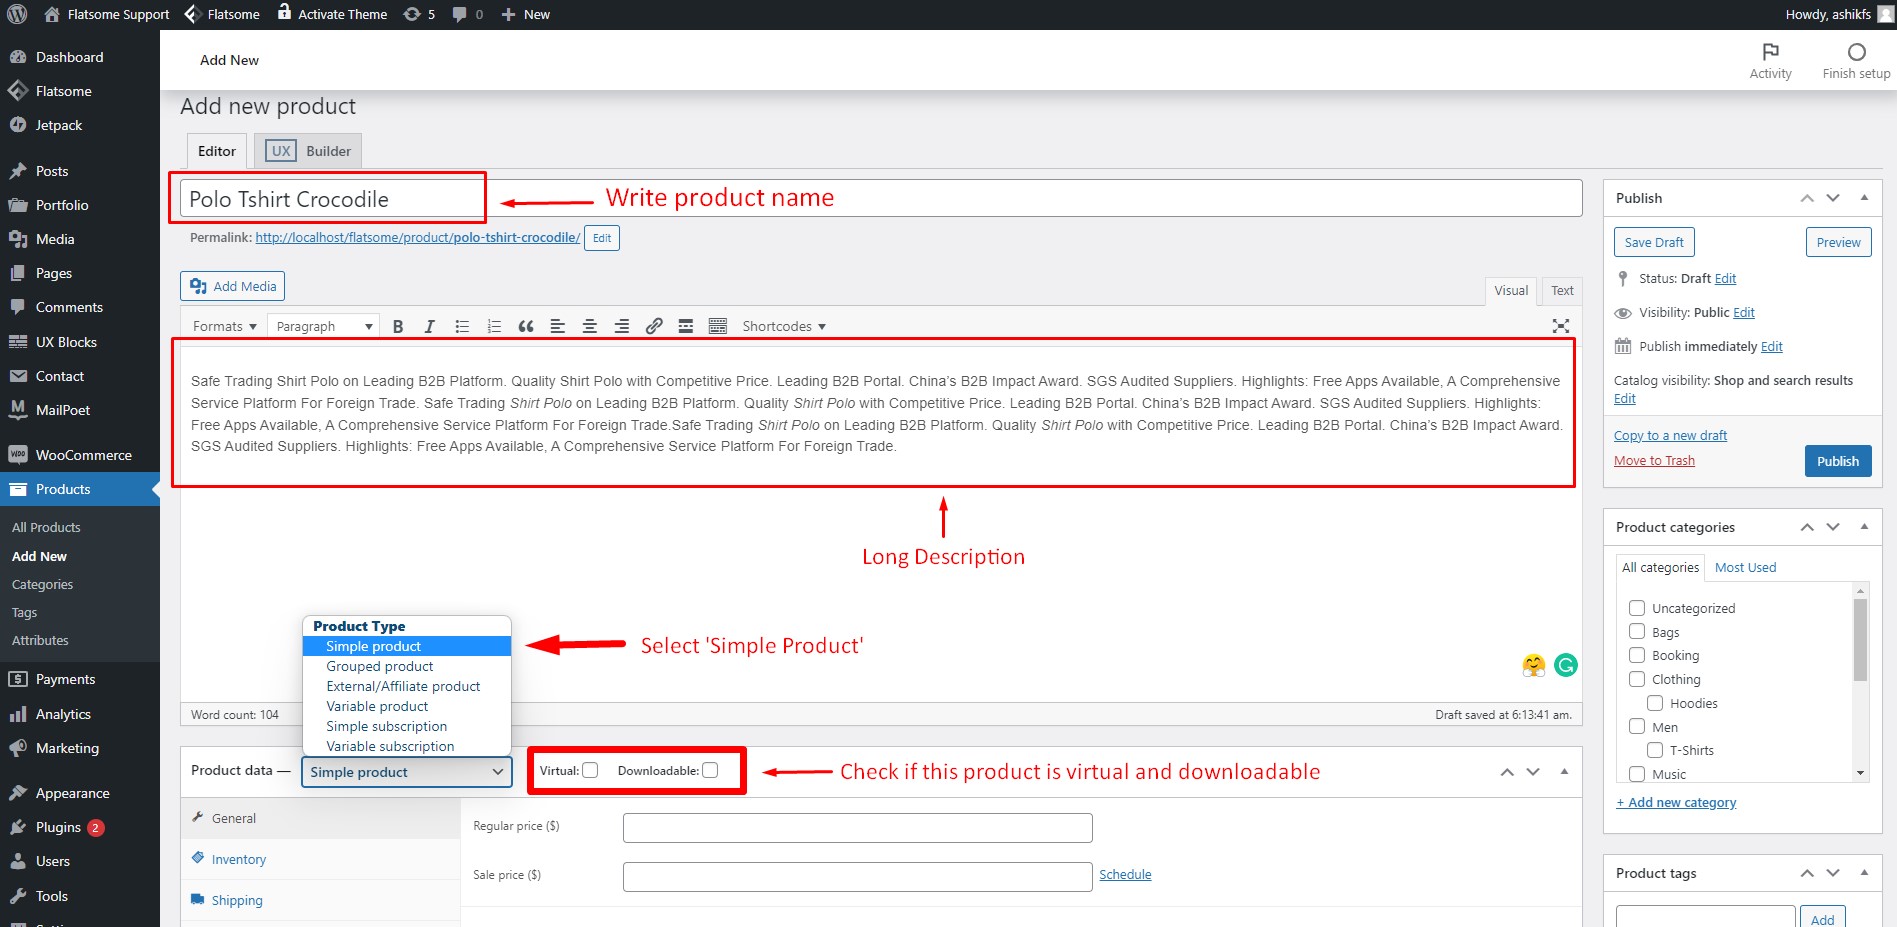 After clicking on ‘Add New’, you will be taken to the page where you can create new products. Write your product name in the product title. You can also write a long product description in the text area marked in the image. Right after the description area, you will find the product data type option. ‘Simple Product’ type is selected by default. You can check the boxes for ‘Virtual’ and ‘Downloadable’ if your product is such.
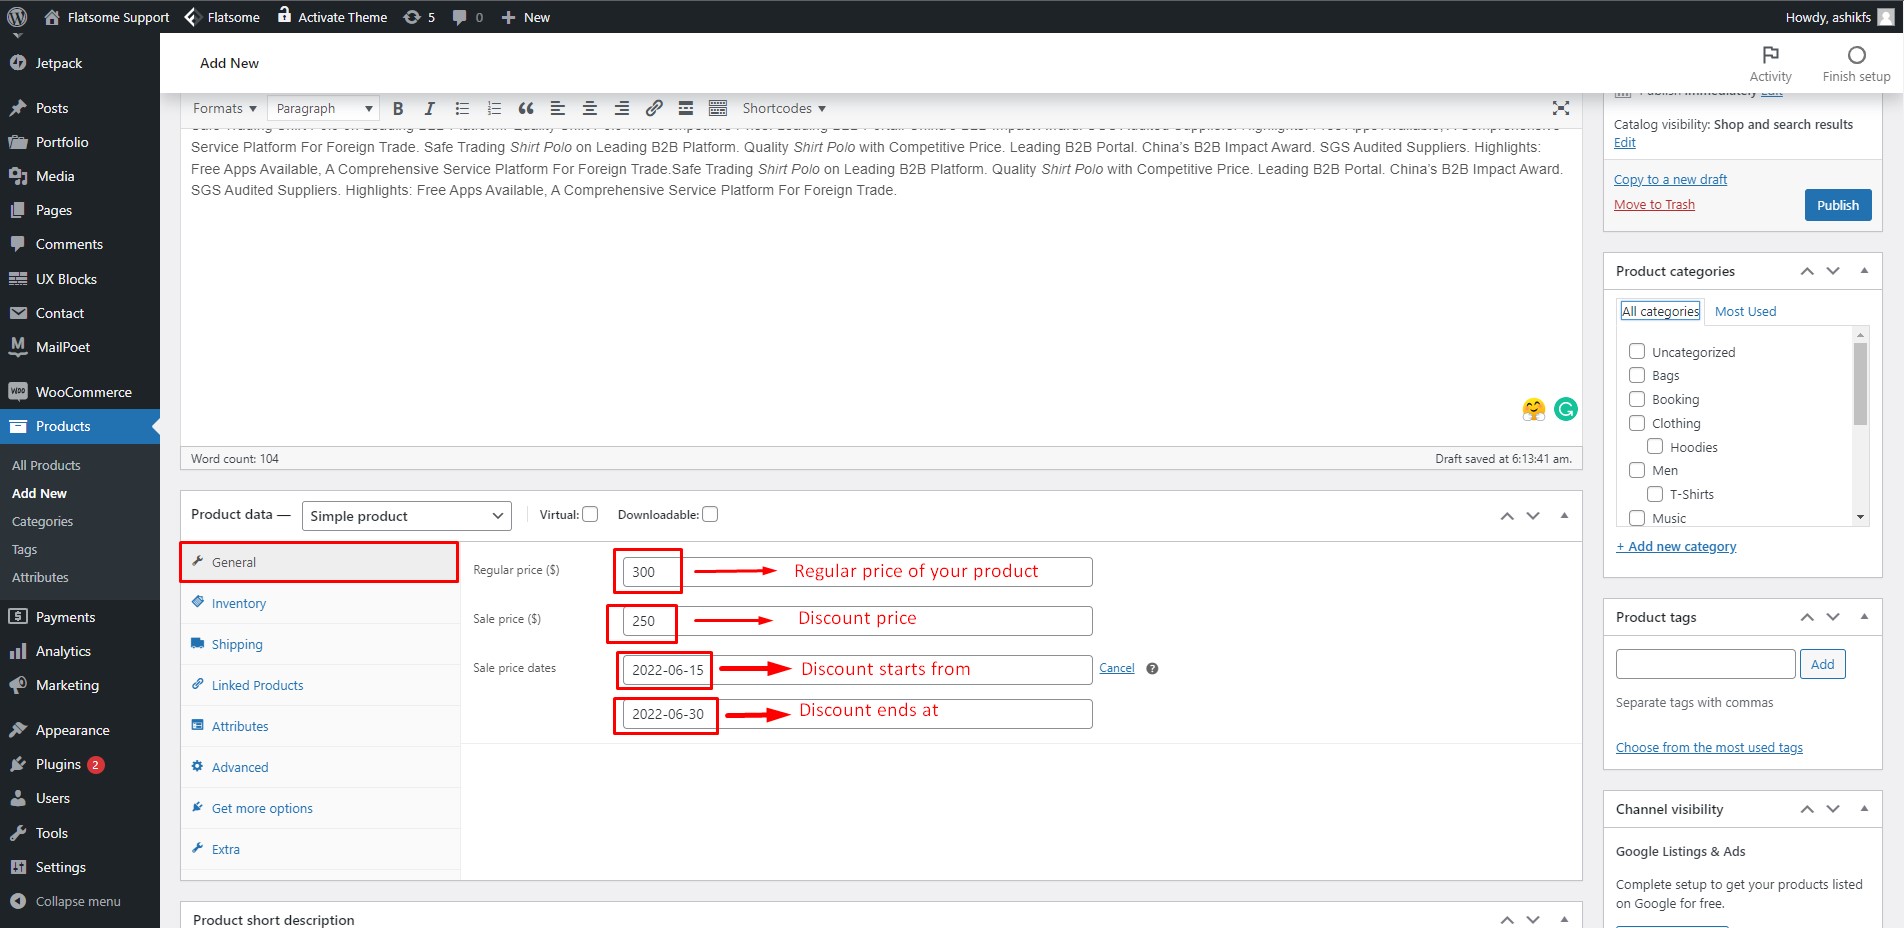 On the General tab, type the regular price of your product in the ‘Regular Price’ field. If it is a discounted or sale item, write the sale price in the ‘sale price’ field. Click on the ‘Schedule’ option beside the ‘Sale Price’ field and set the sale start and end date.
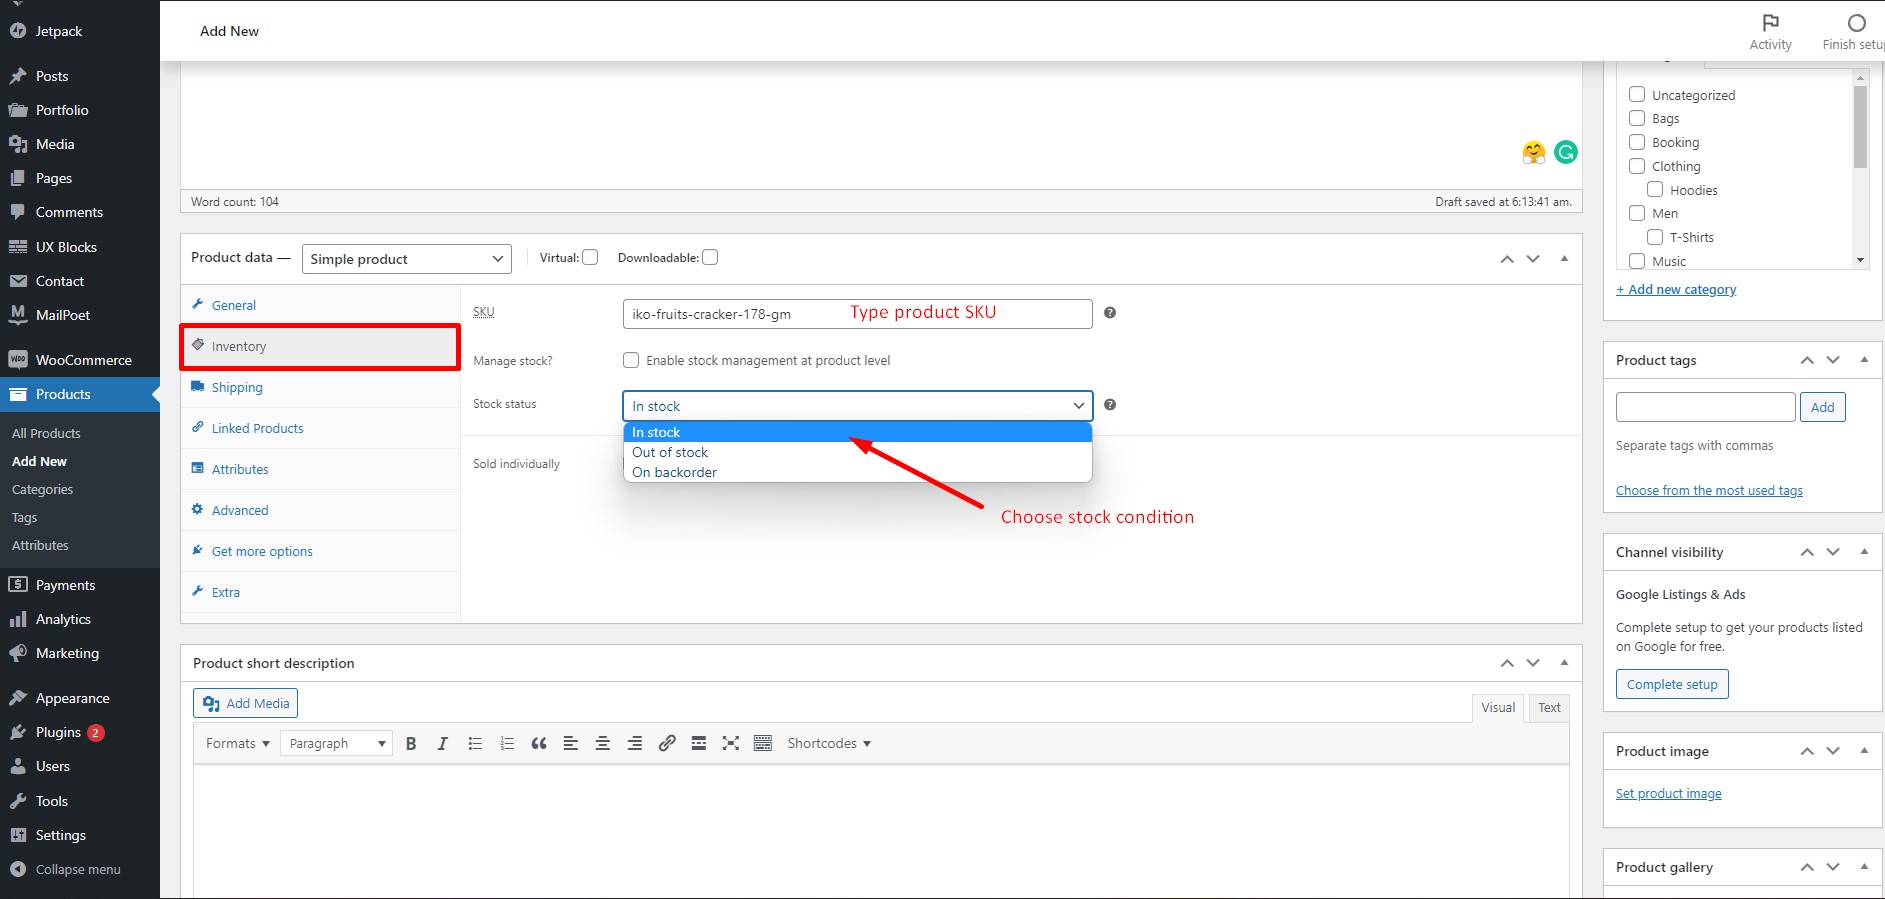 In the Inventory tab, type product SKU in the ‘SKU’ field. Click on ‘Stock Status’ and choose stock condition.
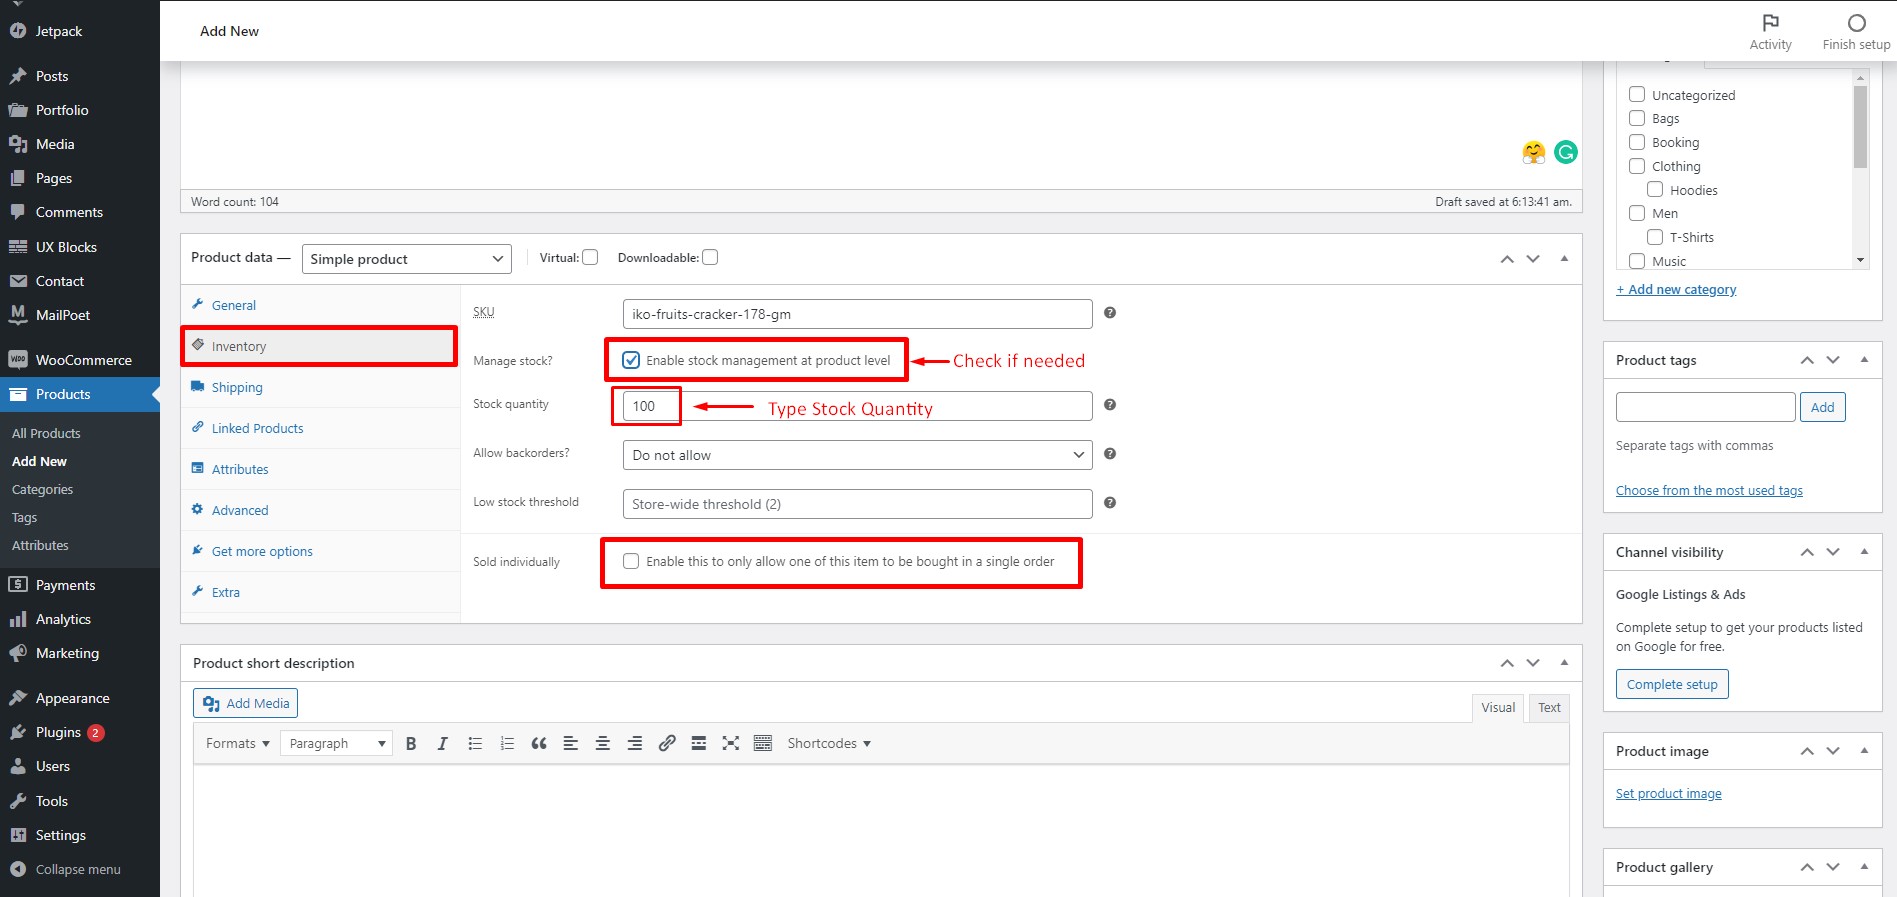 If you want to manage your stock on the product level, check the box for ‘Manage Stock?’. Type the stock quantity in the respective field. Check the box ‘Sold Individually’ if you want to allow only one of this item to be bought in a single order.
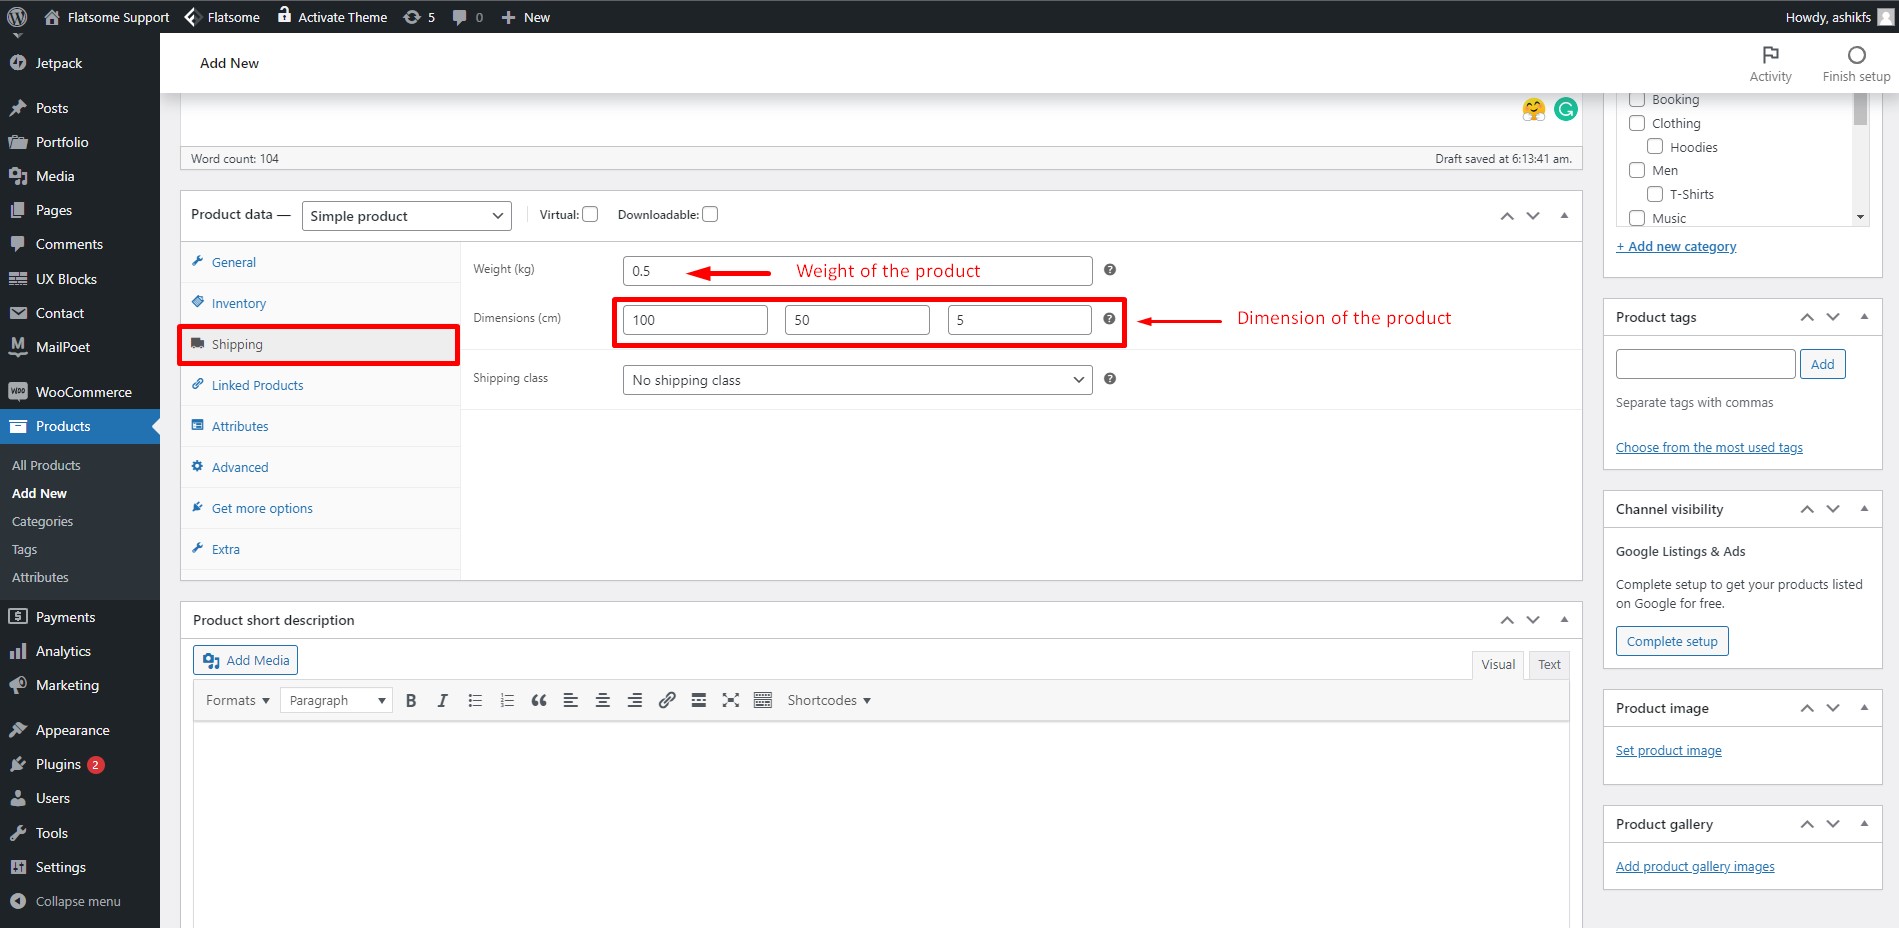 In the Shipping tab, you can specify the weight and dimension of your product. Type the product’s weight in the ‘Weight’ field and dimensions in the ‘Dimensions’ field. If you want you can also set WooCommerce free shipping system by following some simple steps.
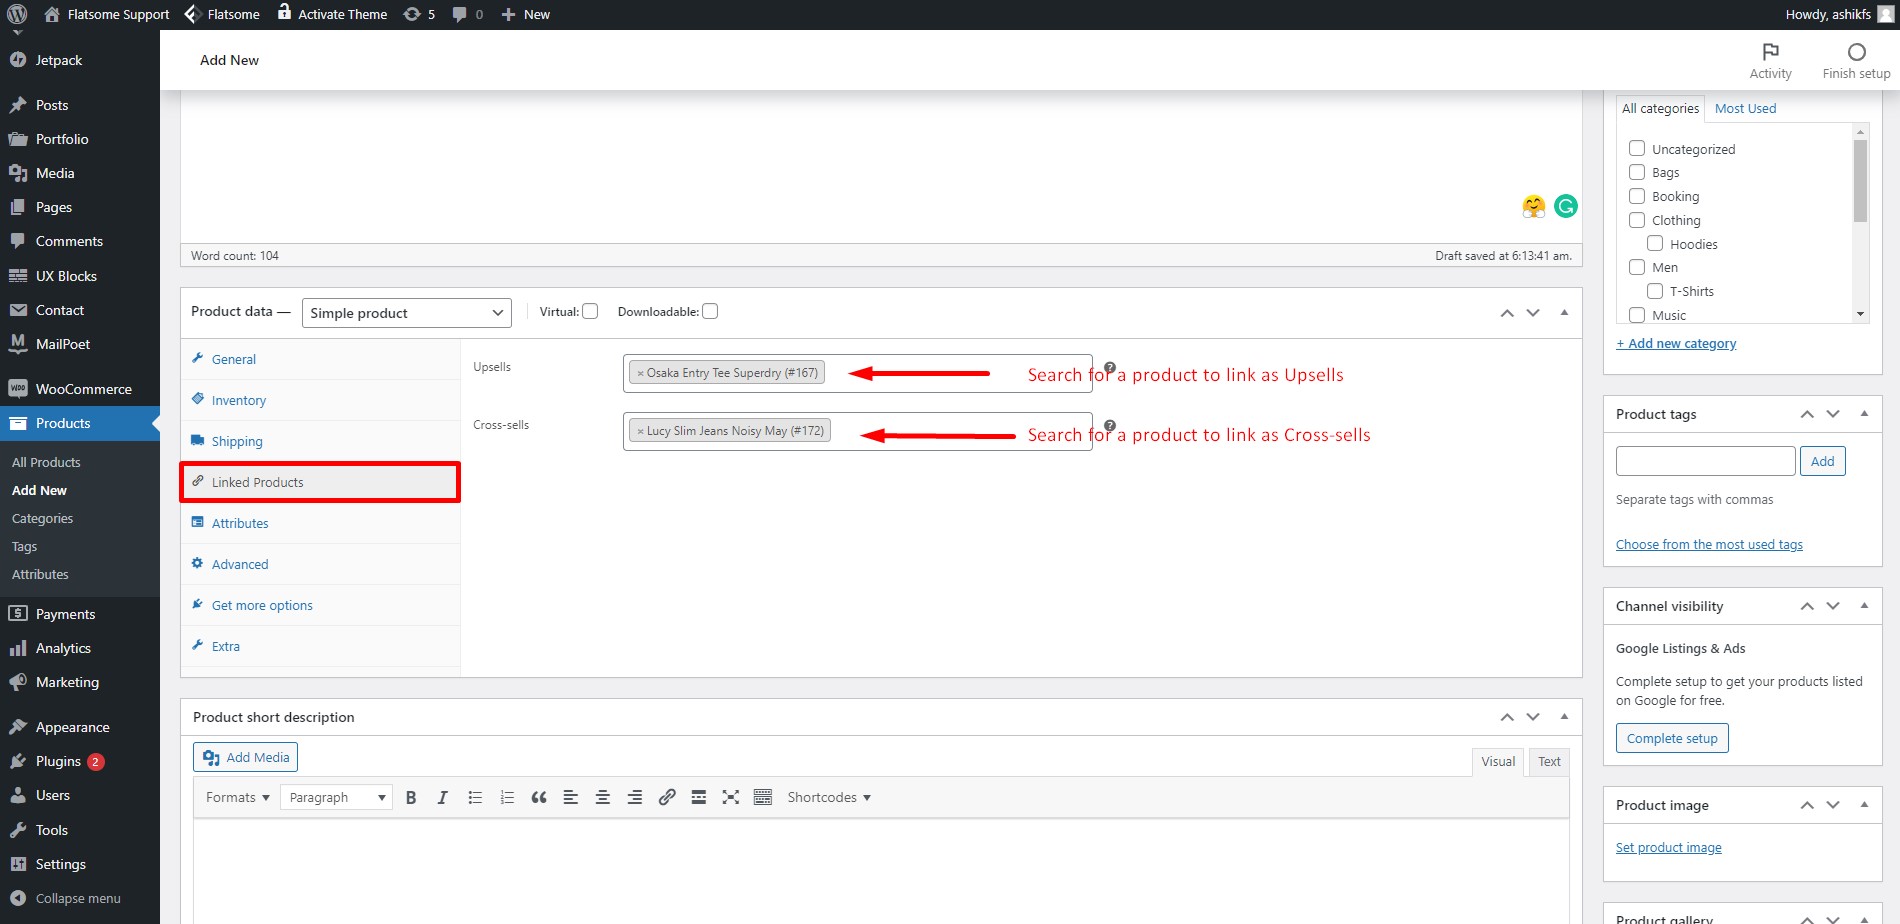 In the Linked Products tab, you can link products as Upsells and Cross-sells. Upsell products are which you prefer recommendation in product to the shoppers over the currently viewed product. Cross-sells products are which you promote in the cart based on the current product.
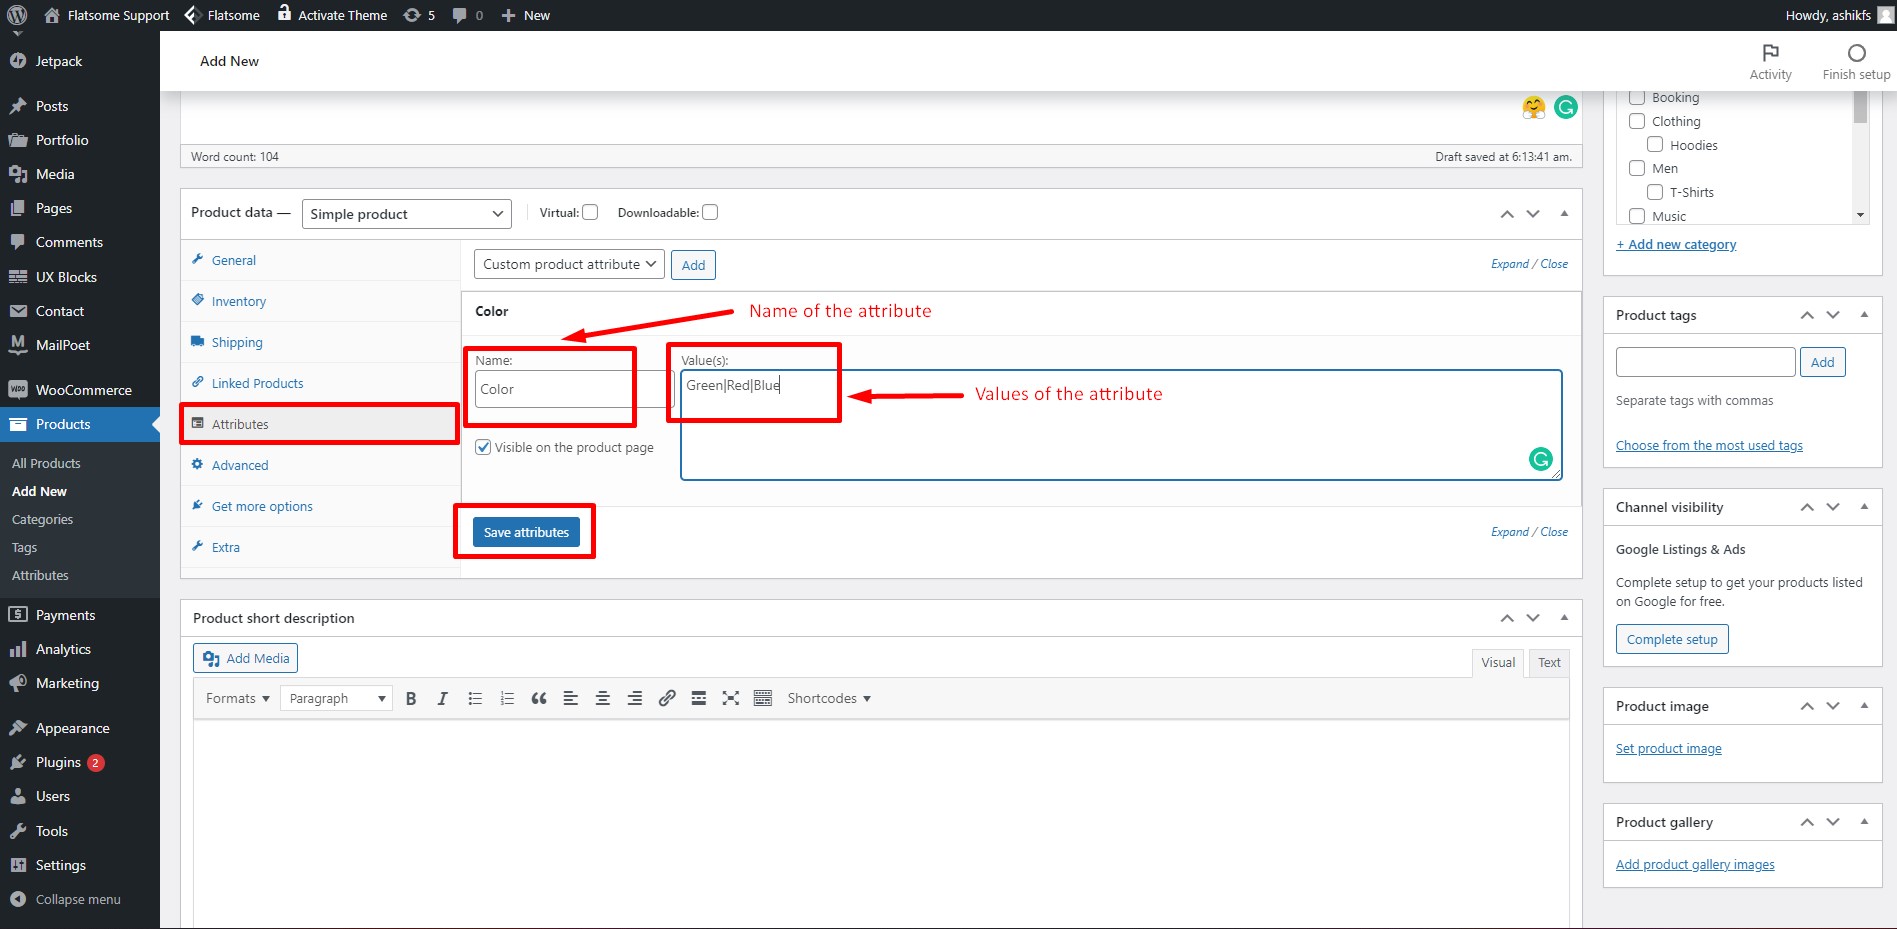 In the Attribute section, you can add certain features or specifications of the product. Write the name of the attribute in the ‘name’ field. Write values of the attribute in the ‘value(s)’ field. Separate each value with the ‘|’. Then click on ‘Save Attributes’. You can also add a WooCommerce product attribute if you want.
 In the Advanced tab, you can set up an optional message you want to send to your customer after the purchase. Write any message on the ‘Purchase Note’ field for the customers. You can also check or uncheck the option for posting reviews of this particular product. Leave the ‘Menu Order’ by default.
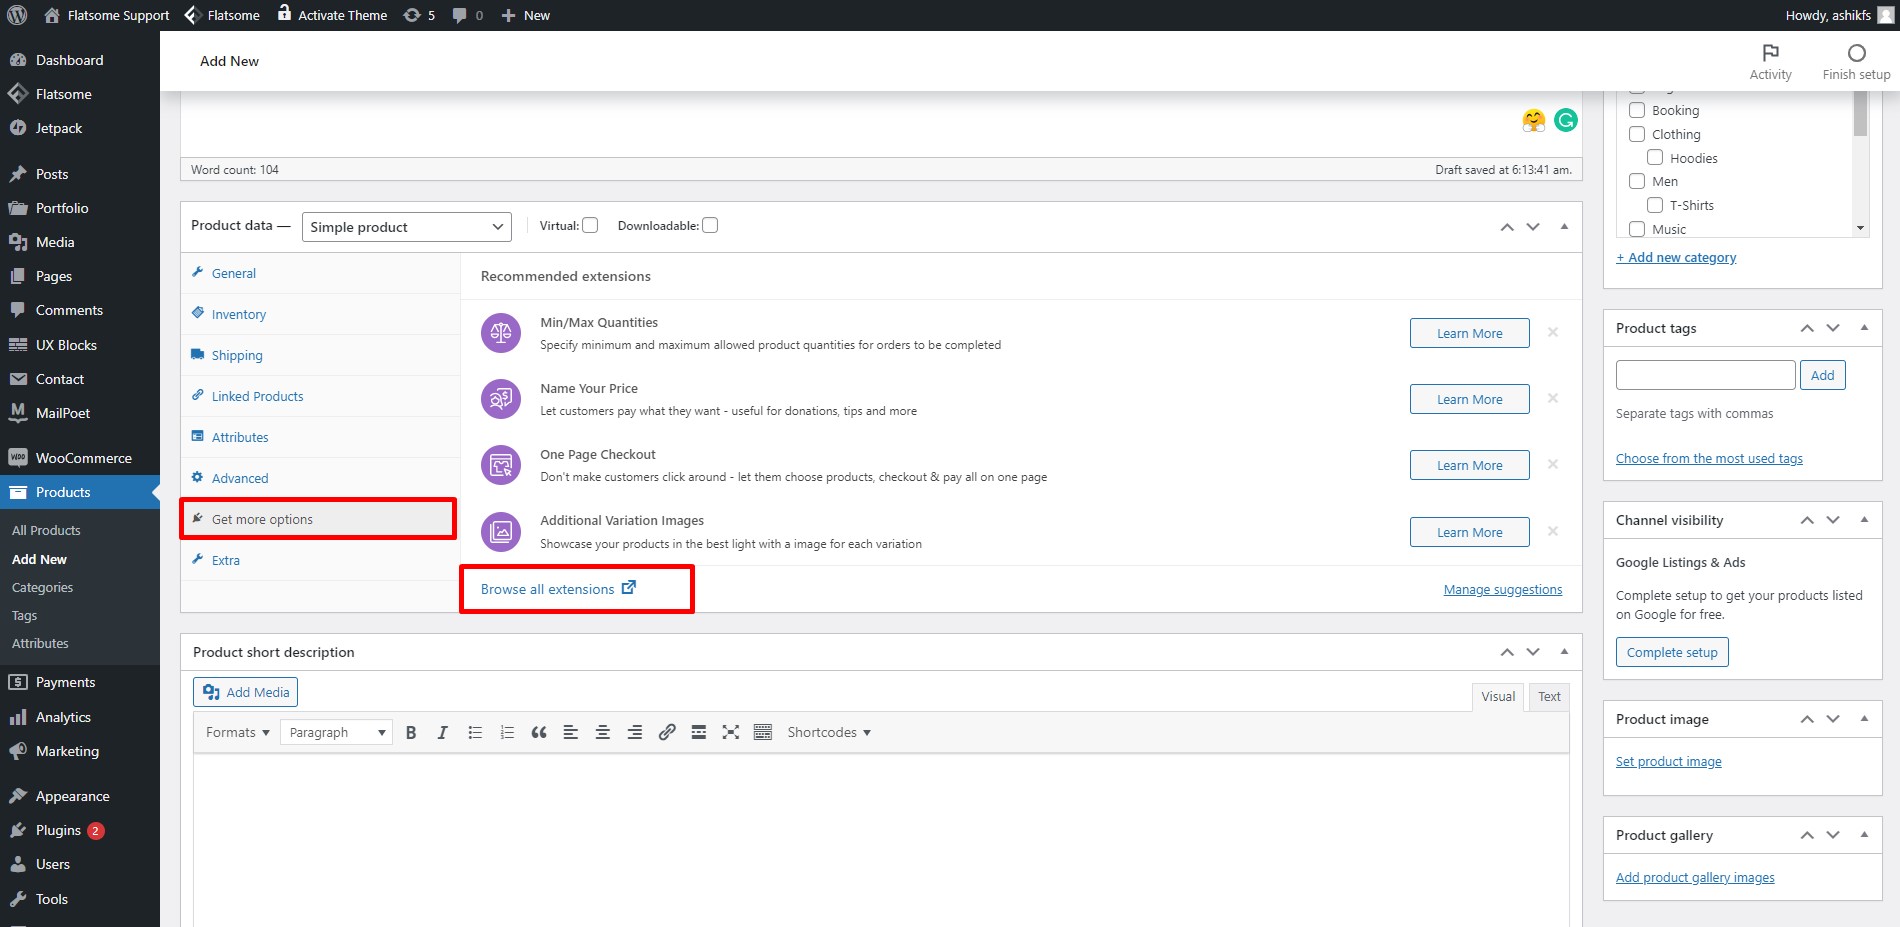 In the ‘Get More Options’ tab, you will be offered different WooCommerce extensions for different shopping operations. You can click on the ‘Browse all extensions’ and visit the WooCommerce extension library to get your preferred one.
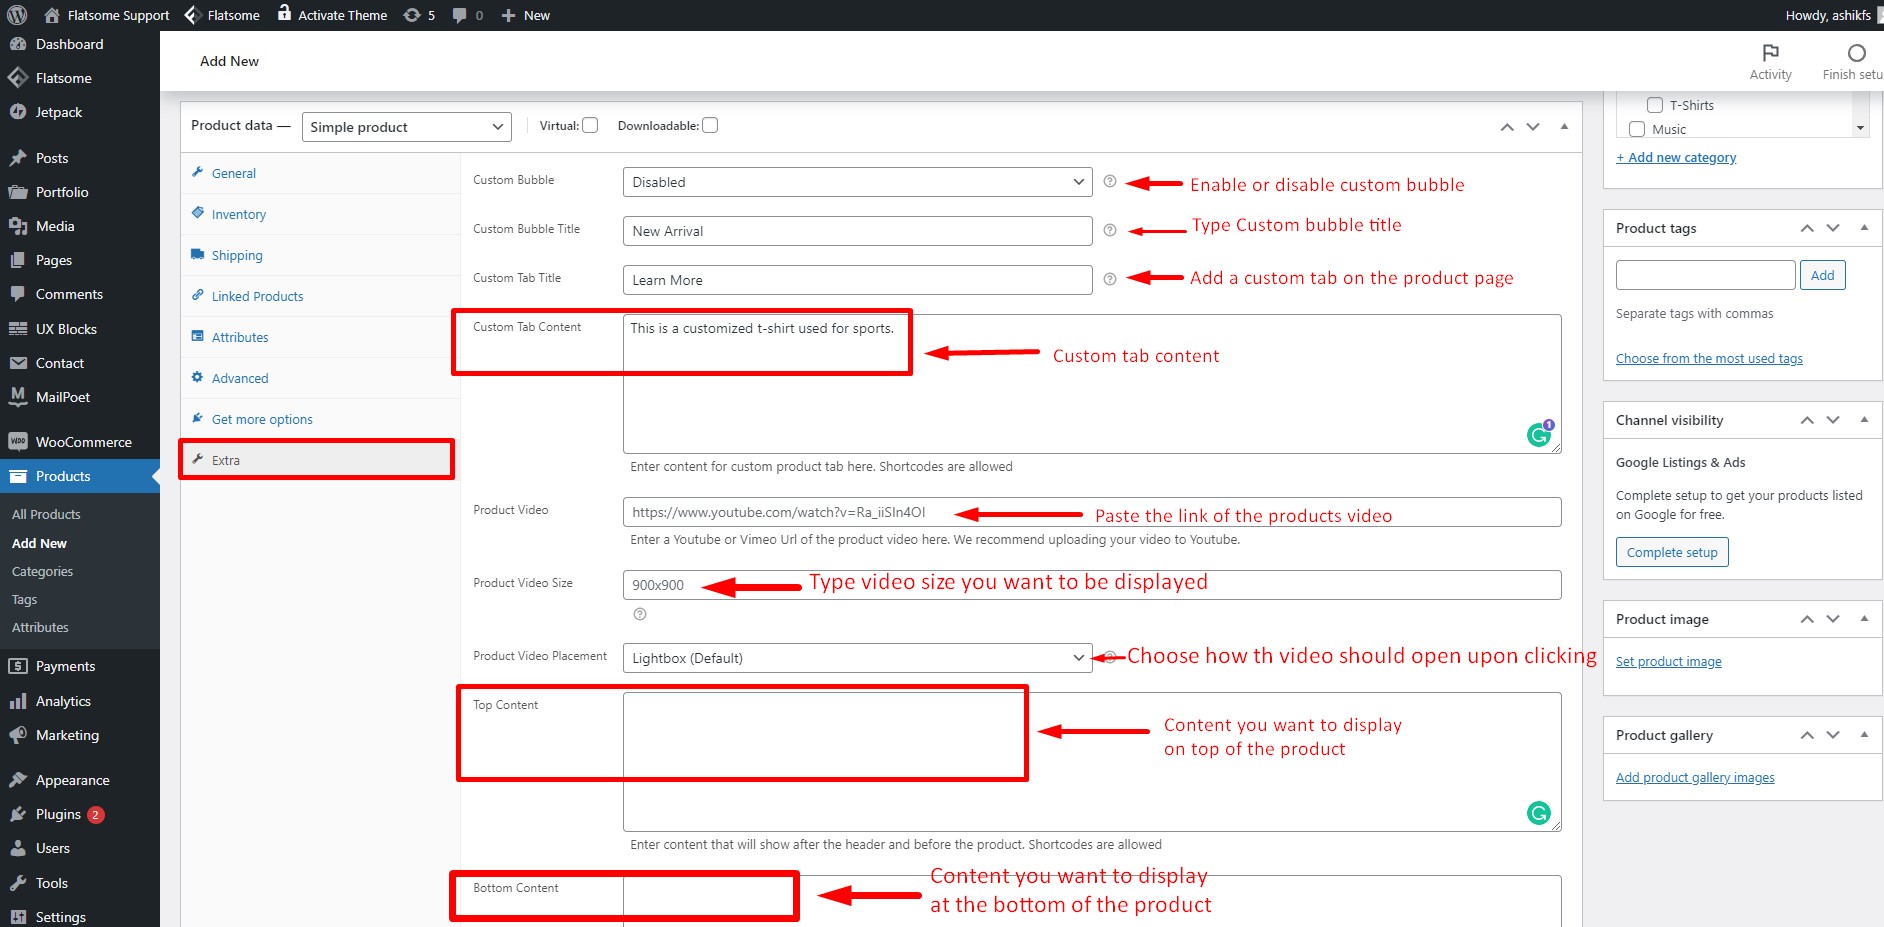 In the Extras tab, click on the ‘custom bubble’ option to enable it. Write the title in the ‘Custom Bubble Title’ field. You can also create a custom tab, simply write the title in the ‘custom title’ field and put your content in the ‘Custom Tab Content’ field. Shortcodes are allowed for custom tab content. In the ‘Product Video’ field, paste the link of your product video to embed it. You can choose whether the video should open in the lightbox like the Flatsome lightbox or in a new tab from the ‘Product Video Placement’ option. You can also show your preferred content on the top and at the bottom of the video. Simply put your content inside the ‘Top Content’ and ‘Bottom Content’ field respectively.
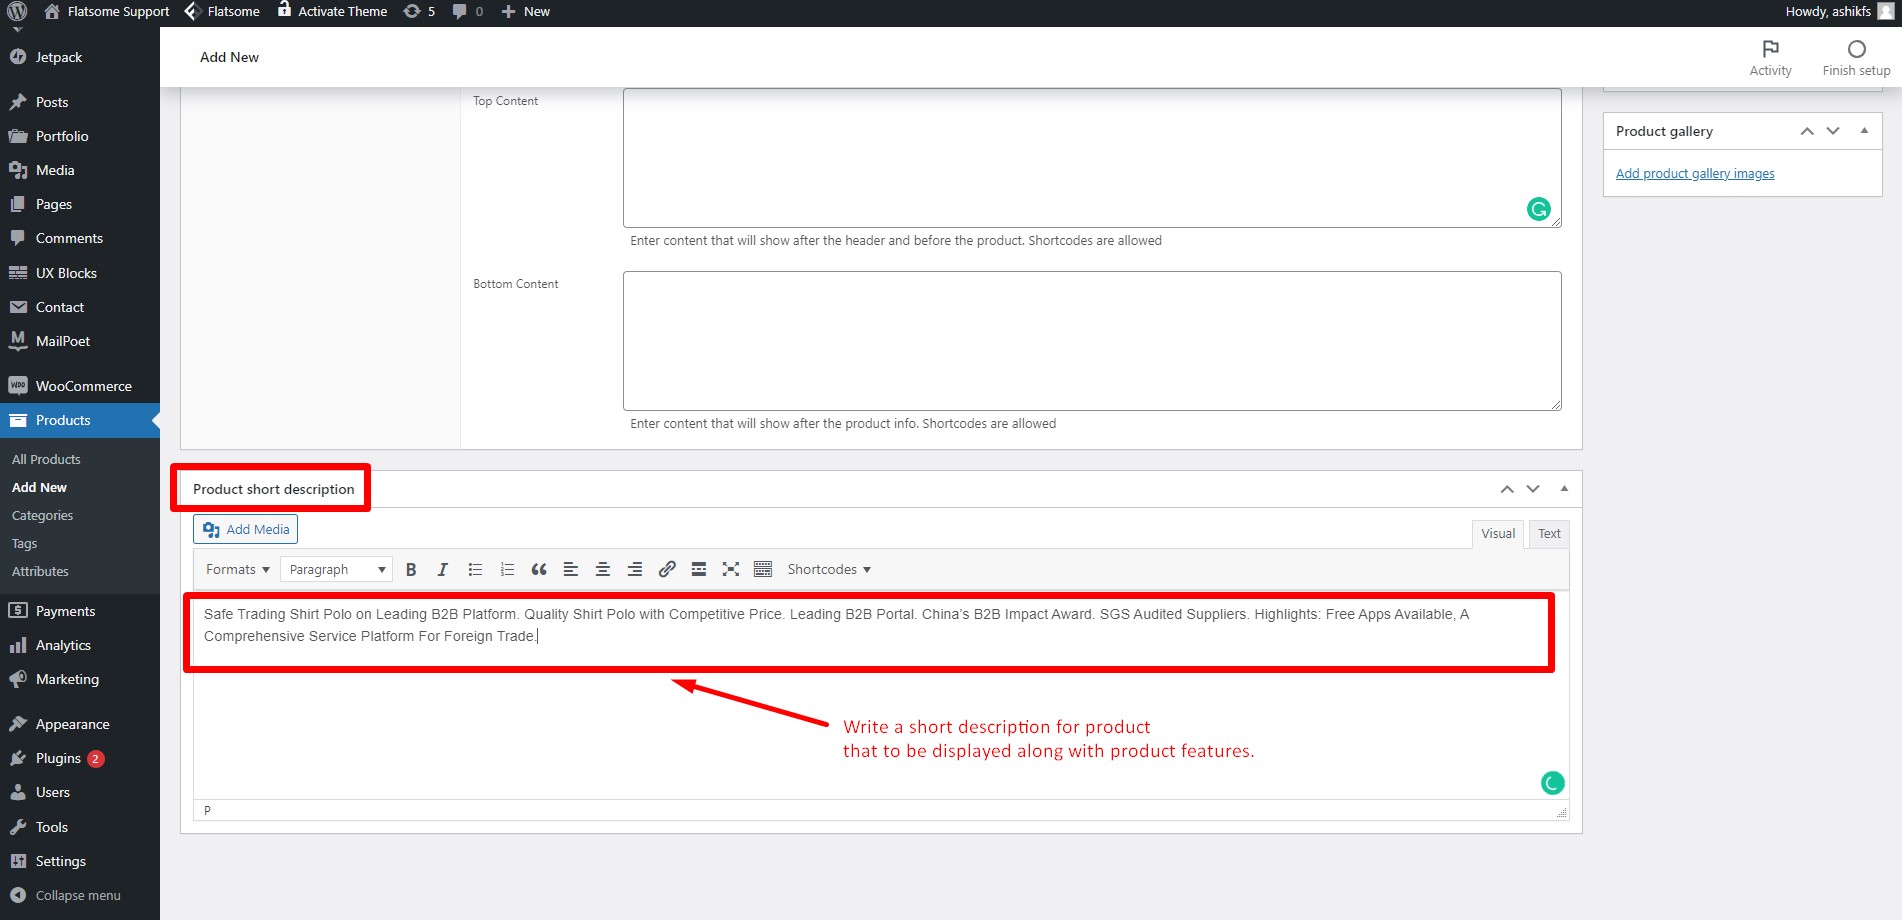 Write a brief description of the product in the short description section.
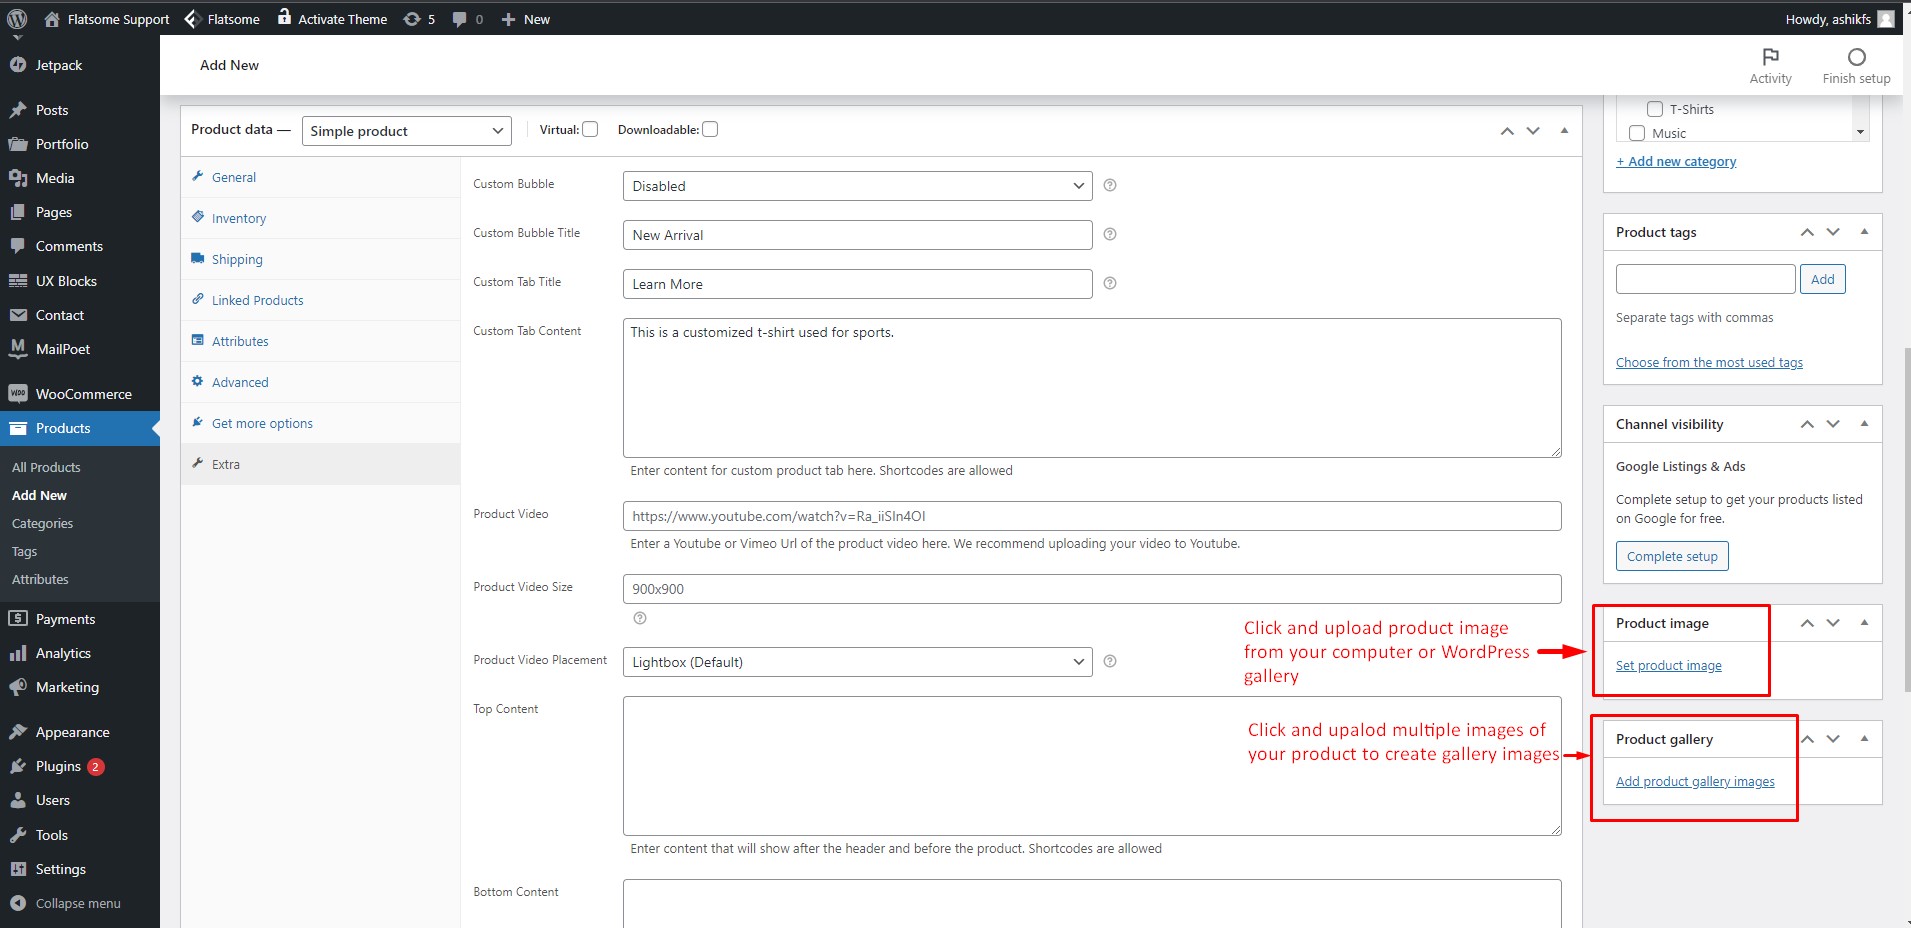 Click on the ‘Set featured image’ option to set a cover image for your product. Click on the ‘Add product gallery images’ to select multiple images of your product to create an image gallery.
 Find your product categories from the ‘Product Categories’ box and check the boxes. Click on ‘save draft’ to save and publish your product later and you can also provide the same saving features for users with the help of the wishlist plugin for WooCommerce. Click on ‘Publish’ to post your product immediately and you have created your first WooCommerce product!
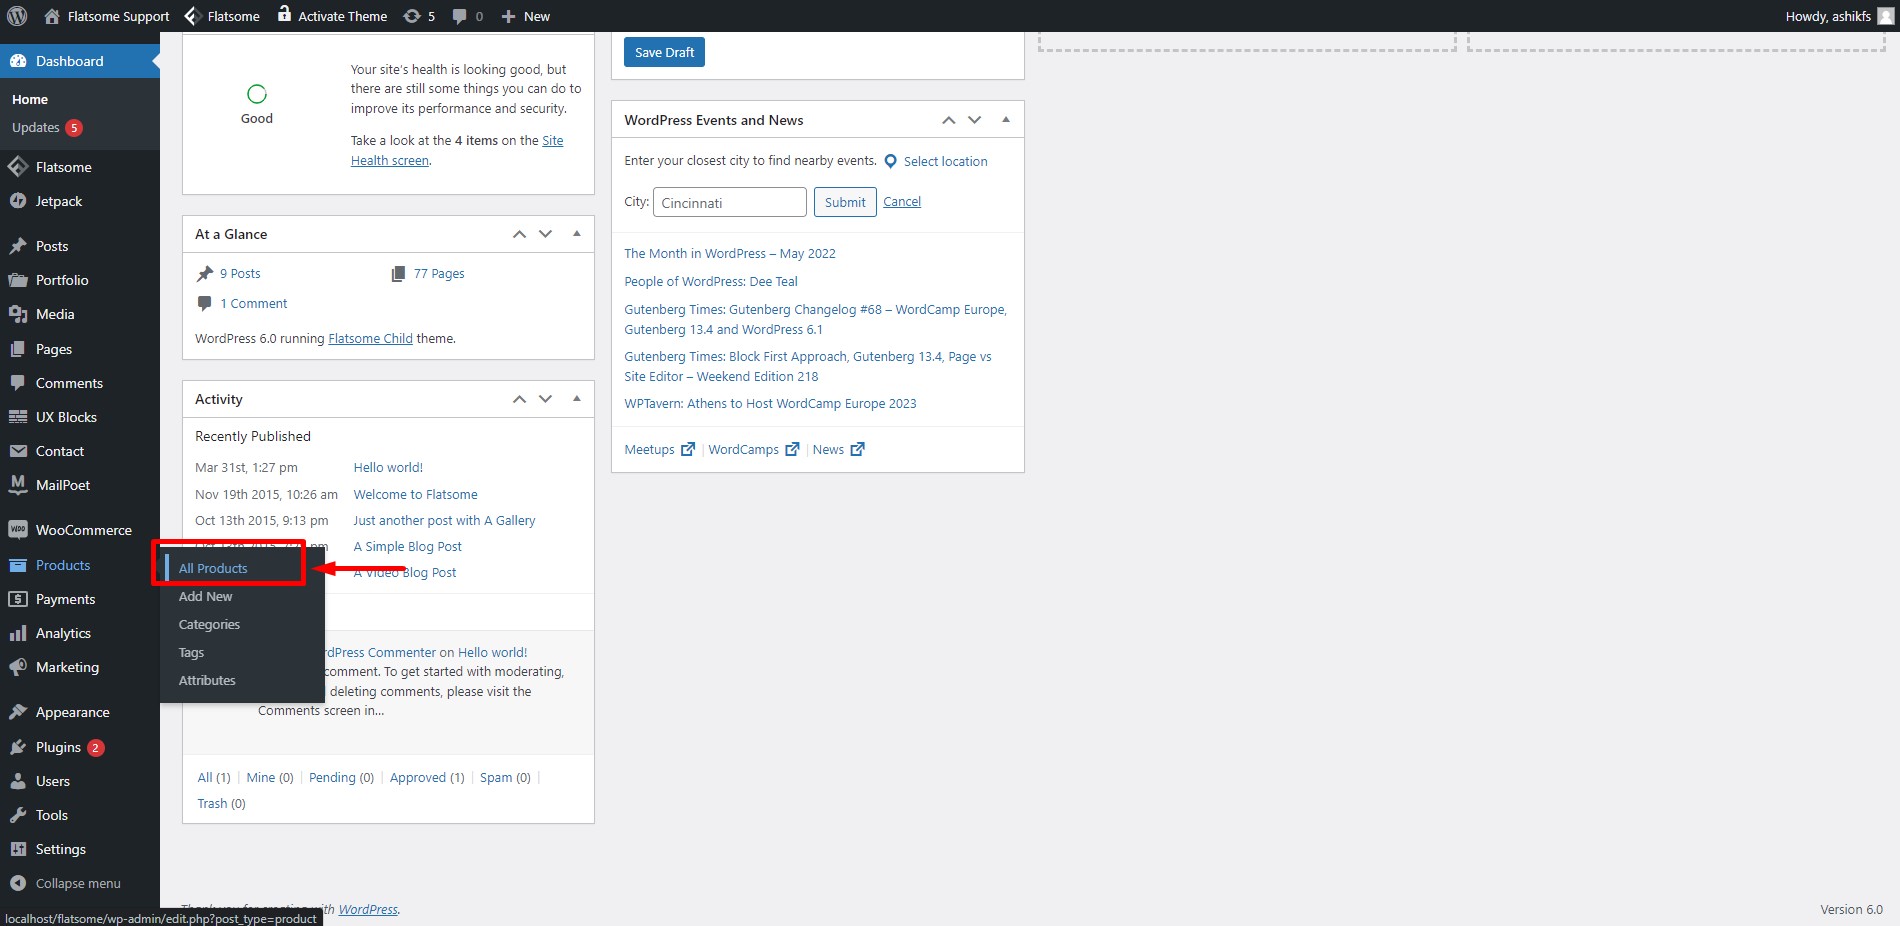 Hover your pointer on ‘Products’ and click on ‘All Products”.
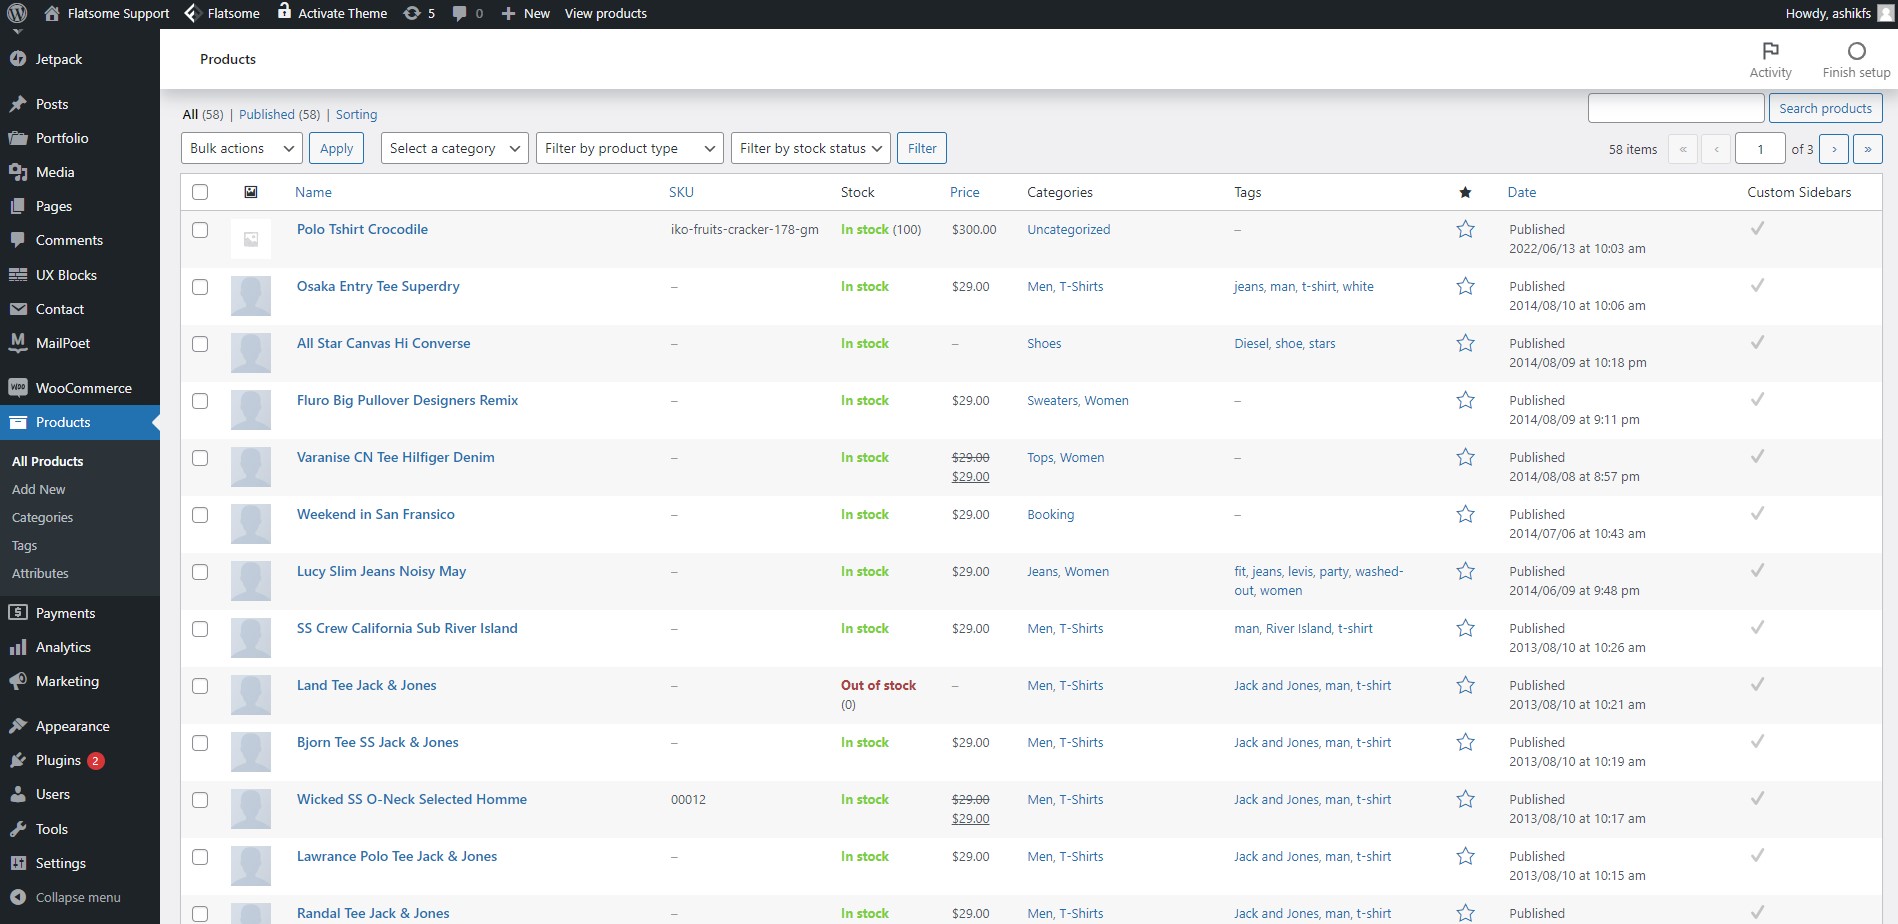 After clicking on the ‘All Products’ option, you will be taken to the product list page. Here you can find all the products you created with product SKU, price, categories, and publish date shown in the list.
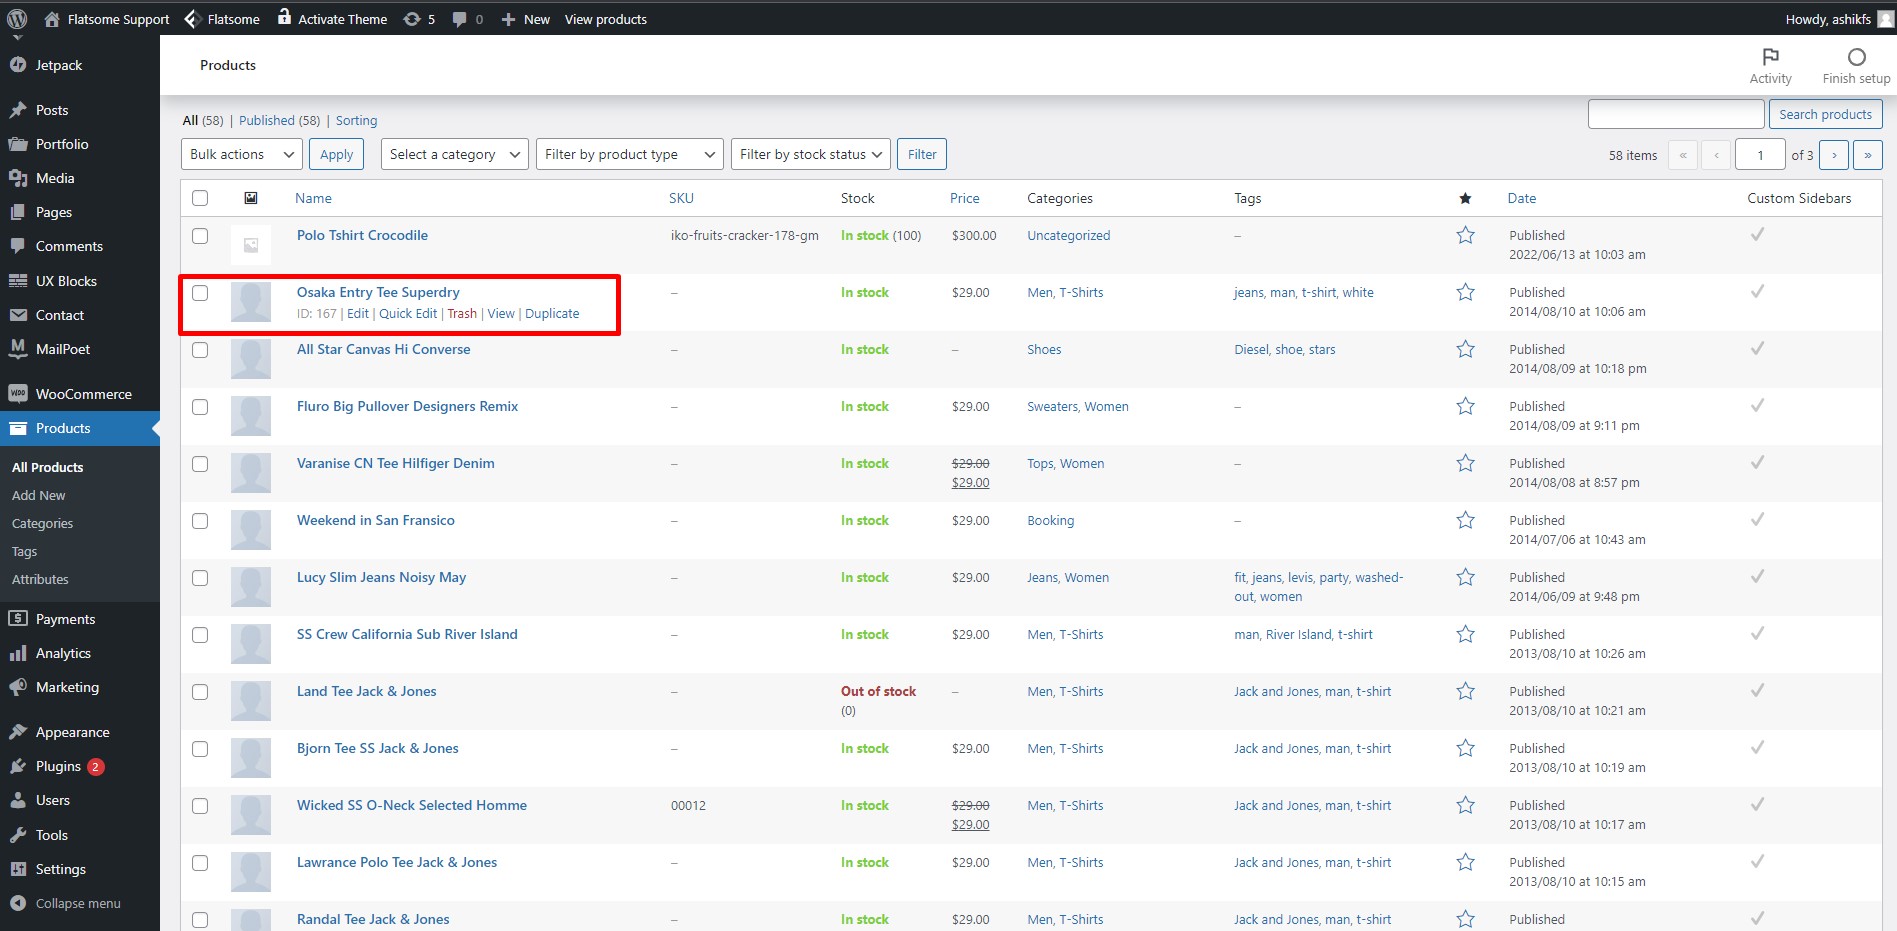 Hover your pointer on any product and you will find options for trash, edit, view, and quick edit.
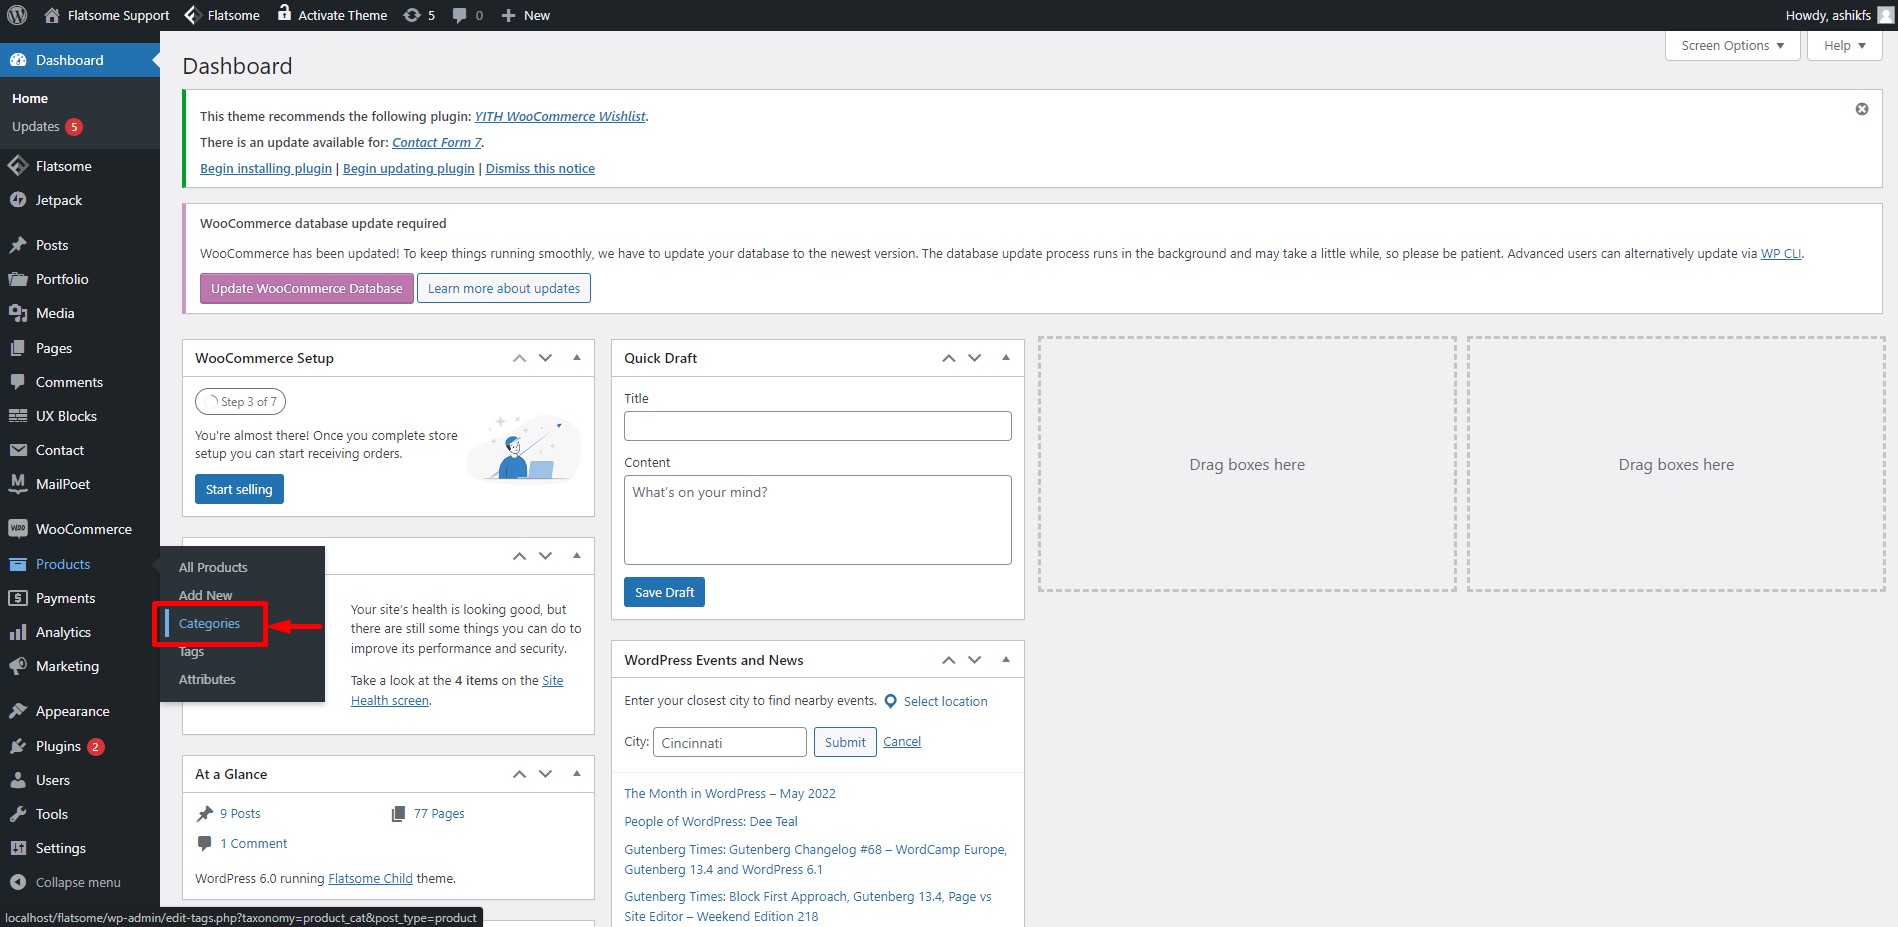 Hover on the ‘Product’ option in the dashboard and then click on ‘Categories’.
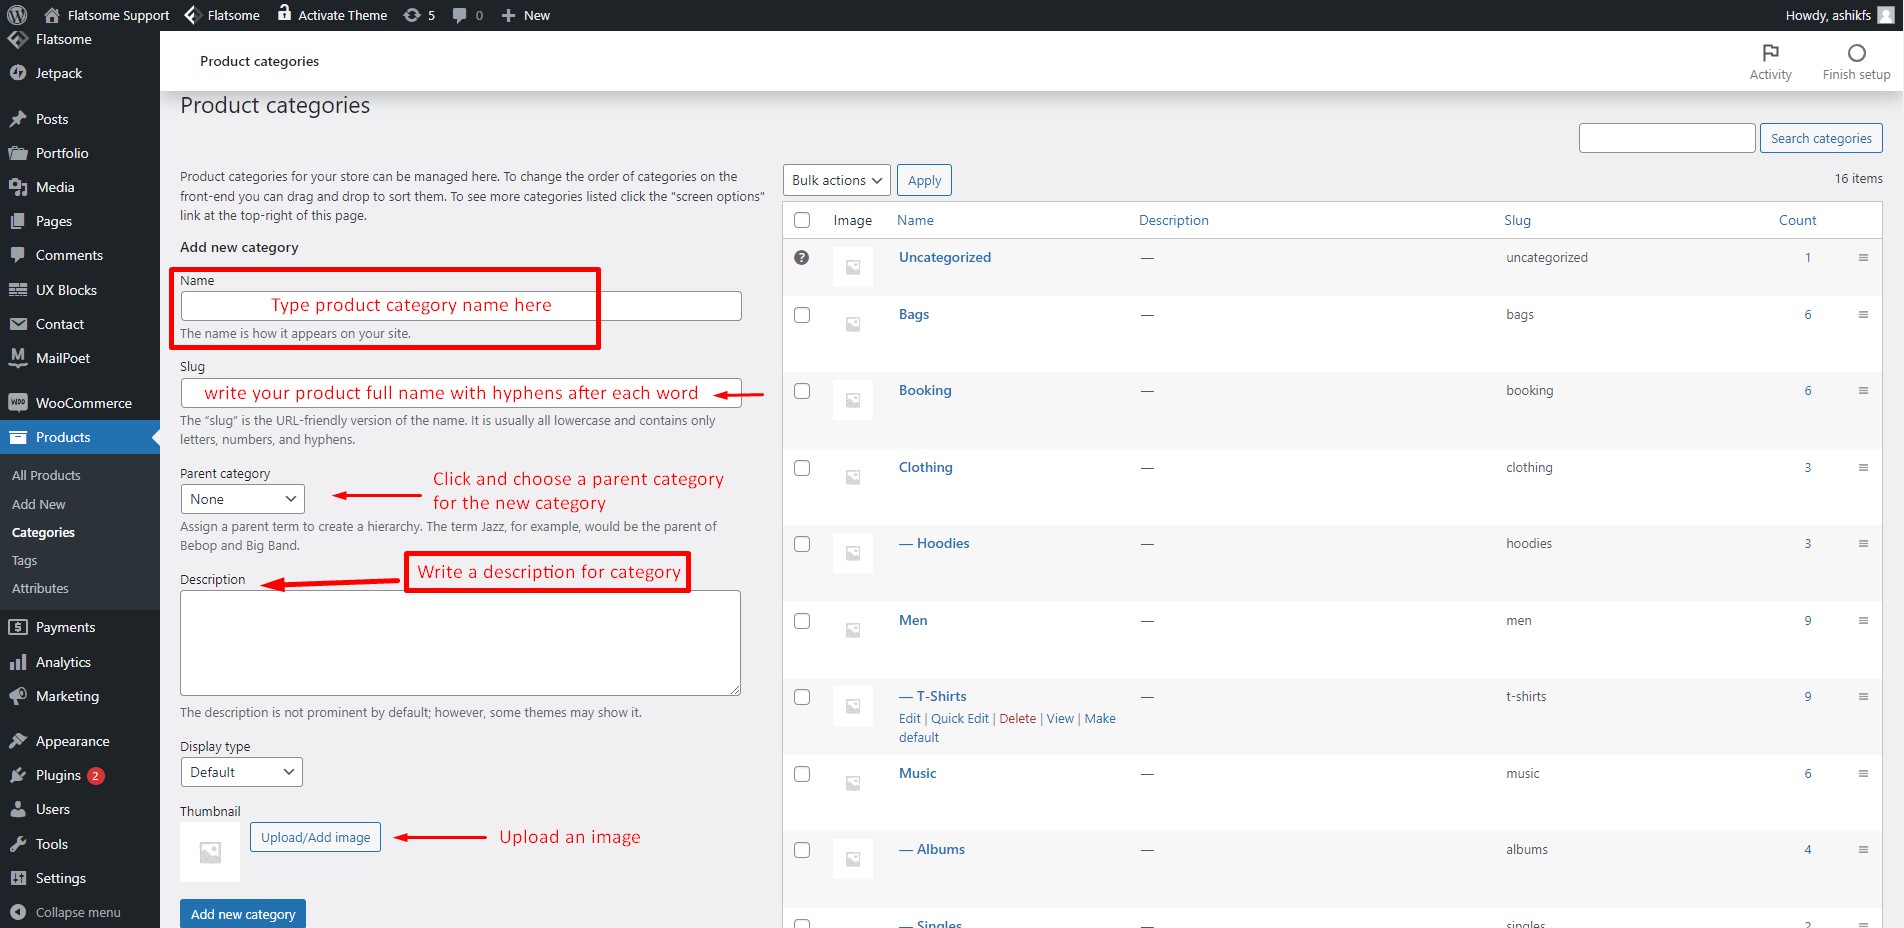 On the Product Categories page, complete the fields with proper information and click ‘Add New Category’. You will find all your create categories here. You can also edit any category by simply hovering on it and then clicking ‘Edit’. You can also set the sidebar menu for category collapse and expand easily with some simple steps.
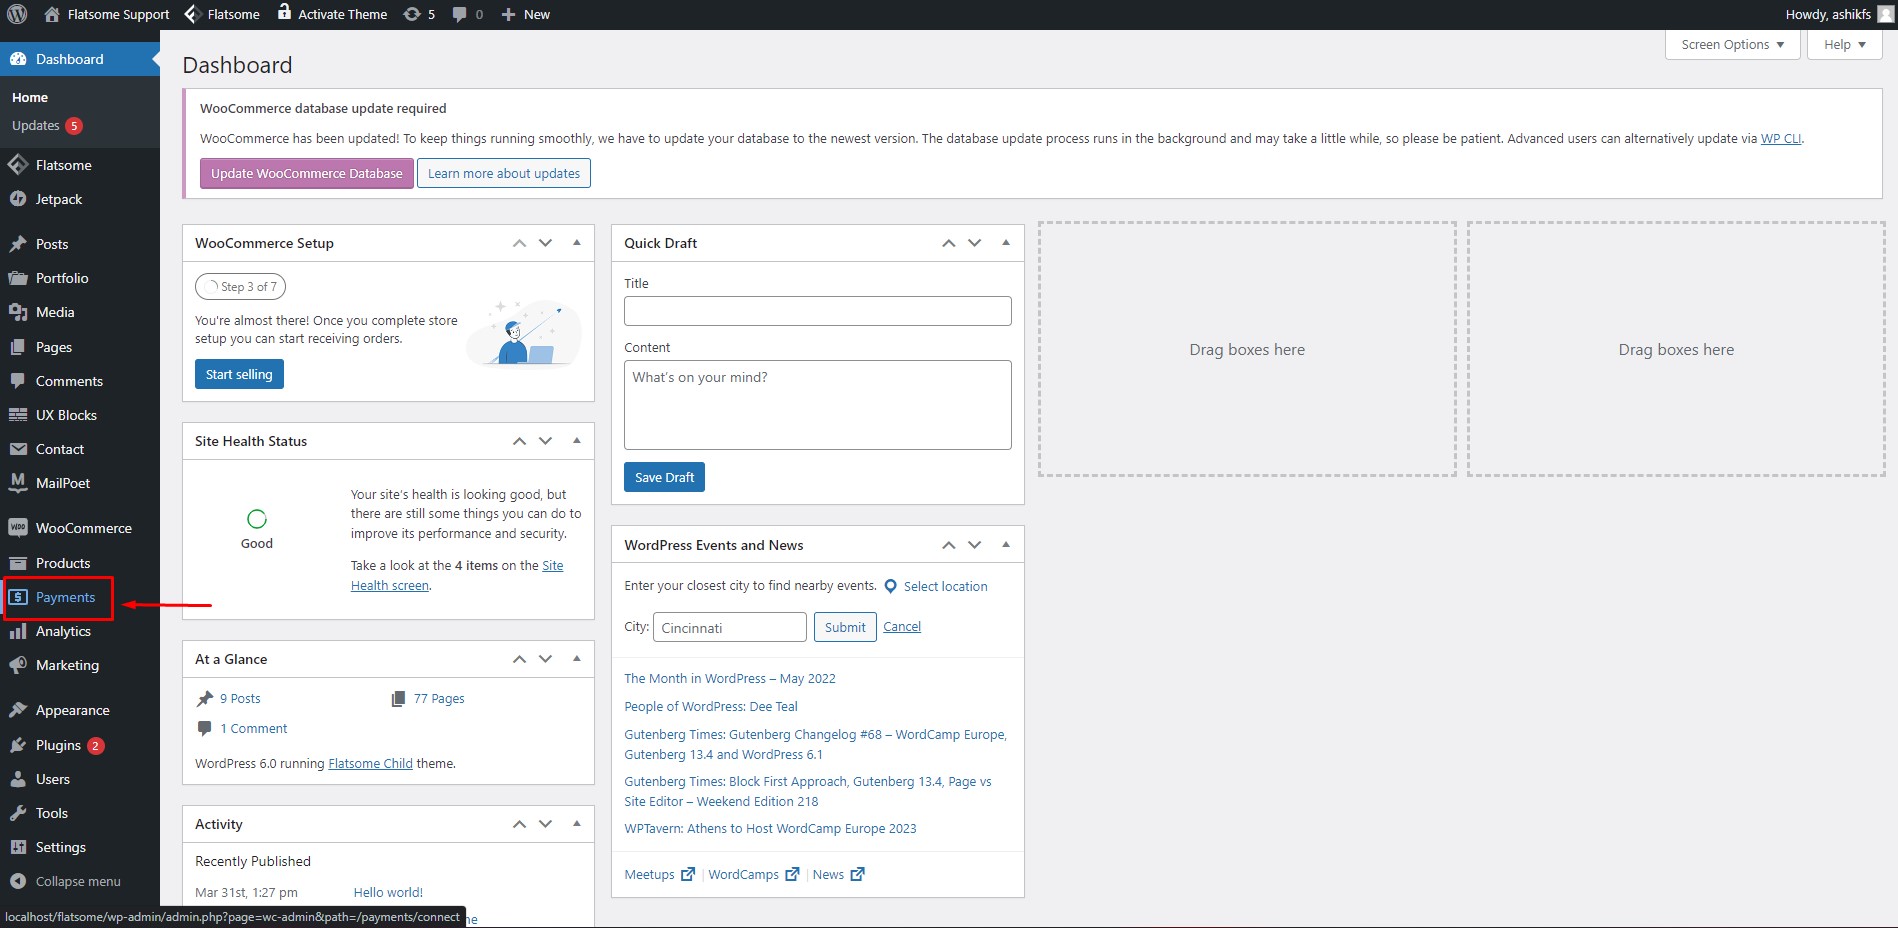 It’s time to set up a payment method. On the dashboard, click on the ‘Payment’ option.
 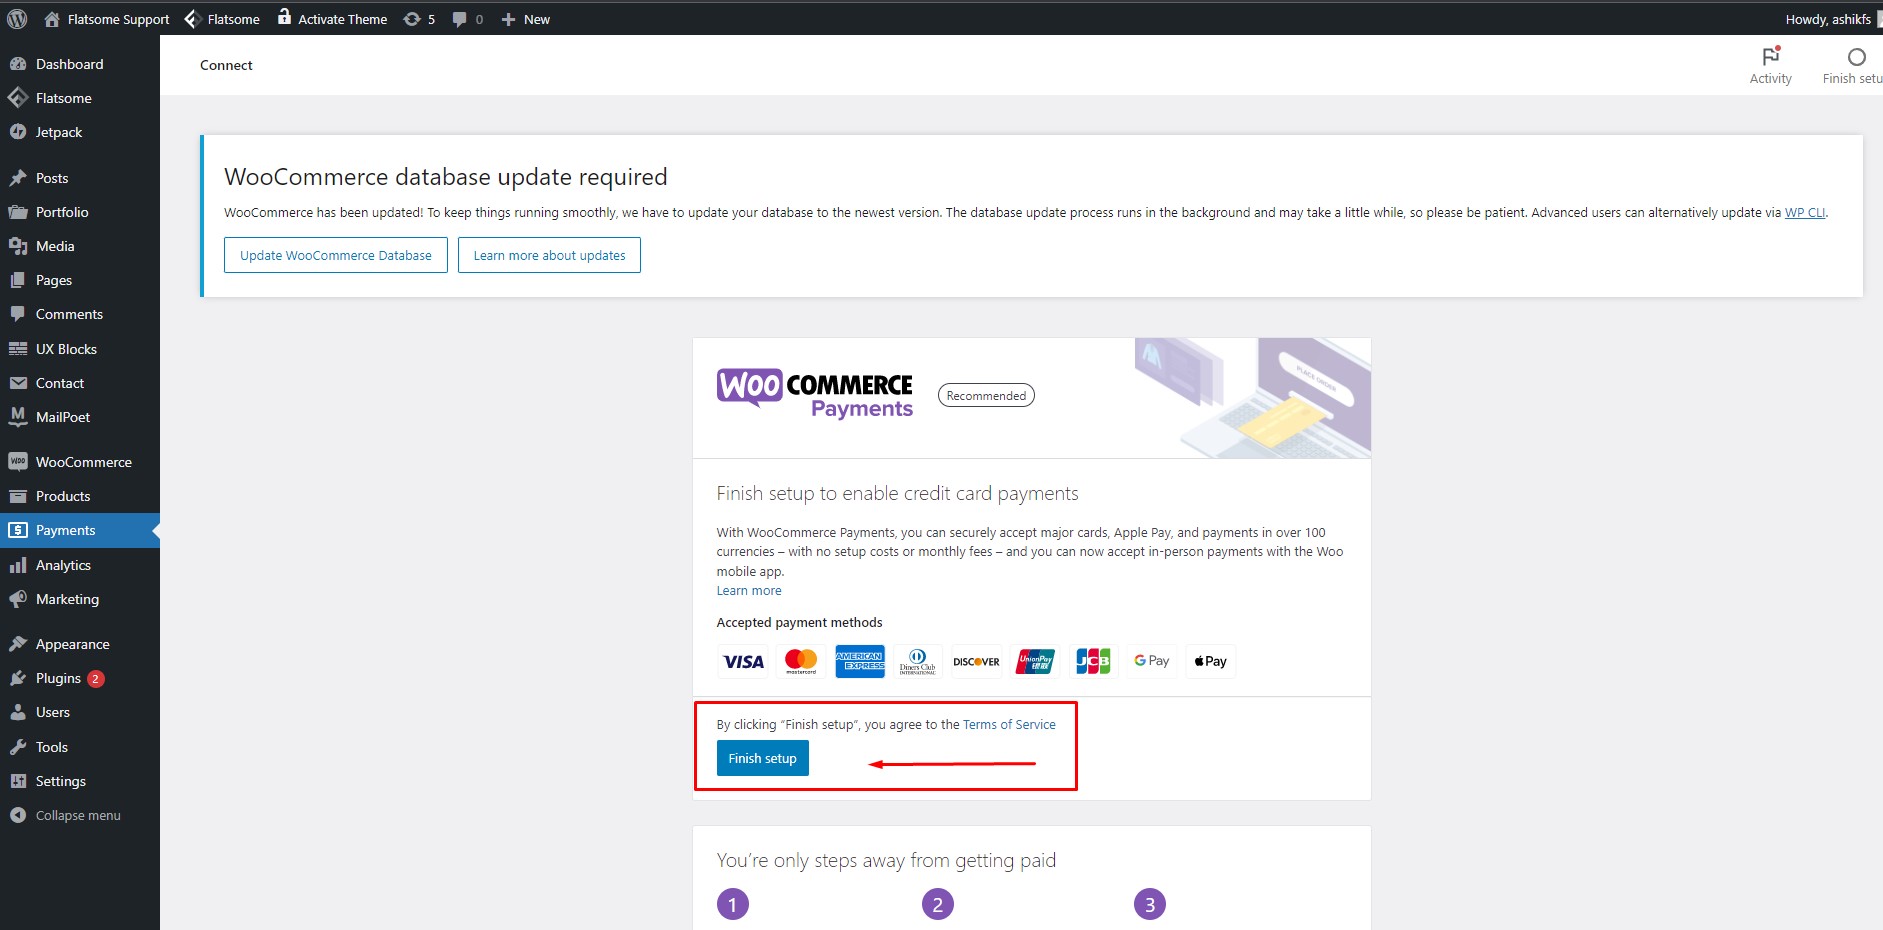 The WooCommerce plugin does all the hassle for you to provide payment methods. All you have to do is to click on the ‘Finish Setup’ button and the payment method setup is done! You can also add payment option icons to your website if you want.
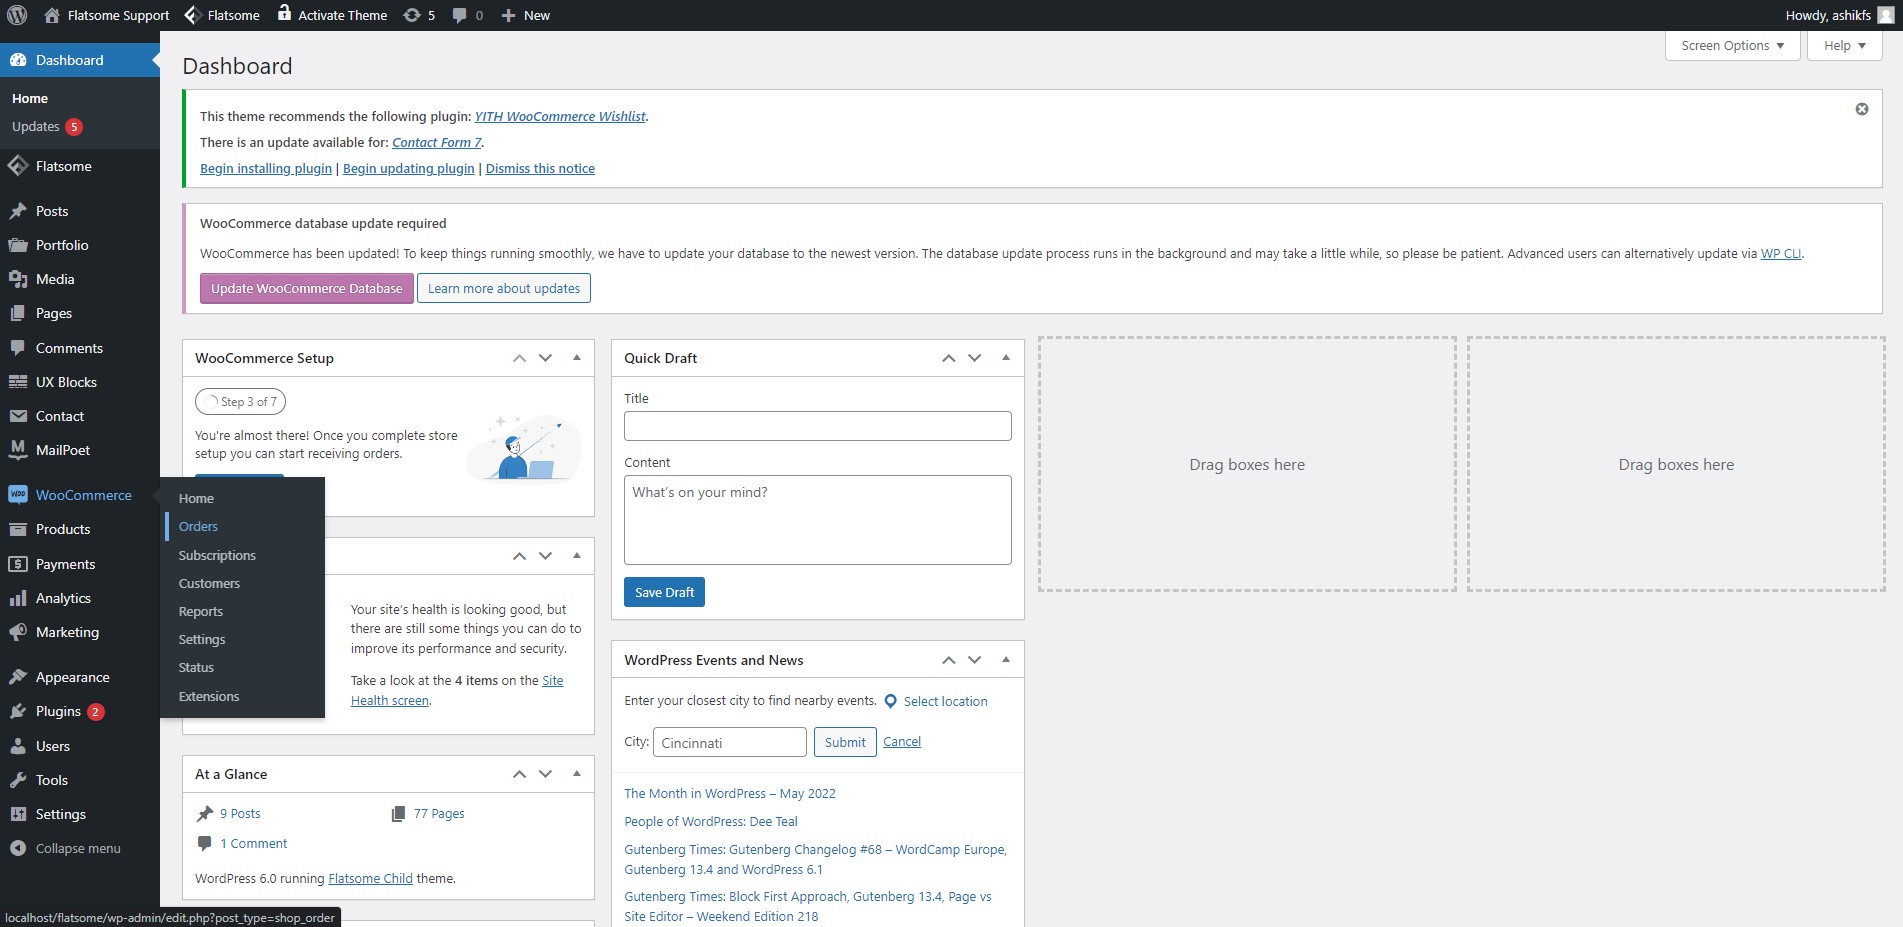 Hover the pointer on ‘WooCommerce’ in your dashboard and click on the ‘Orders’ feature.
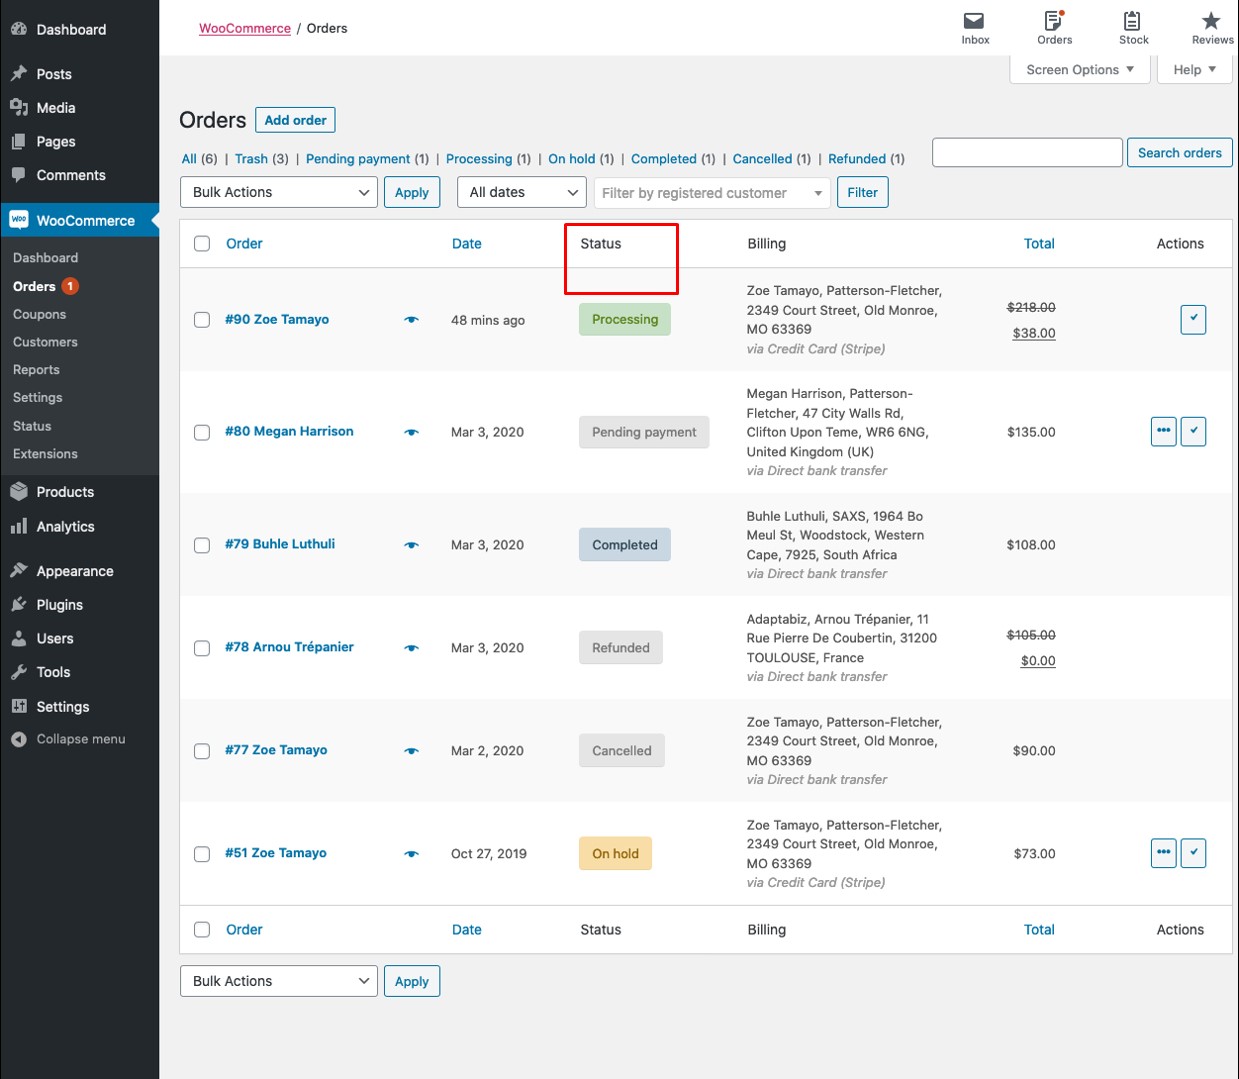 You will be redirected to the Orders page. From here, You will be able to keep track of all your orders. Mark the status of your order based on your order processing by clicking the ‘action’ option at the left end. You can browse your orders by status like pending payment, on hold, delivered, etc.